

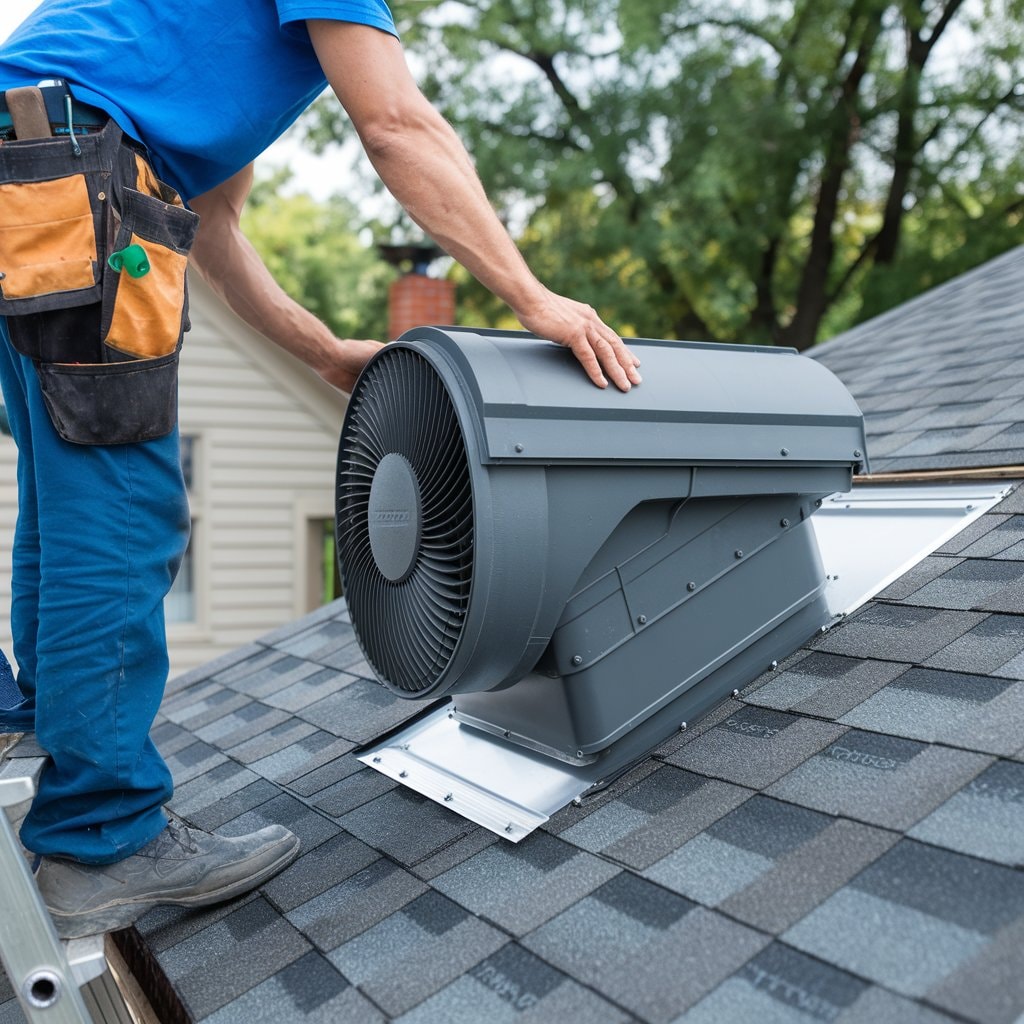
The installation of a roof ventilation fan and roof vent is a critical procedure that demands meticulous planning and execution. Selecting the appropriate location on the roof, which influences both the efficiency of air extraction and the longevity of the ventilation system, is the first step. The process requires precision in cutting the roof to fit the vent without compromising the structural integrity of the building. While these initial steps seem straightforward, the real challenges lie in the intricacies of ensuring a watertight seal and making secure electrical connections. These factors are essential to ensuring a successful installation, leading one to ponder the best practices for addressing these technical details.
What is a Roof Vent Fan, and Why Do You Need It?
A roof vent fan is an essential component designed to enhance air circulation within your home’s attic space. It plays a pivotal role in the overall roof ventilation system. Proper ventilation is crucial for preserving air quality and overall comfort and for protecting structural integrity by mitigating potential moisture and heat accumulation.
Installing a roof vent fan offers numerous benefits, including improved energy efficiency and prolonged roof lifespan, which underscores its importance in residential construction.
Understanding Roof Ventilation Basics
Roof vent fans are essential components designed to improve air circulation within attic spaces, thereby reducing heat and moisture, which can result in various issues. Installing a roof ventilation fan involves several key steps and considerations to guarantee performance and structural integrity.
Here’s a quick guide on the essential elements involved:
- Choosing the Right Location: The placement of the roof vent fan is vital. It should be near the centre of the roof to maximize air extraction. Measure the attic space to determine the number of fans needed—generally, one fan per 300 square feet of attic space is advisable.
- Preparing the Vent Hole: Cut a vent opening in the roof using a saw, ensuring the hole matches the size of the vent pipe or the roof fan unit. This is essential to avoid gaps that could lead to leaks.
- Securing the Fan: Install the roof vent fan onto a sturdy wooden frame to support its weight. Use roofing cement around the vent pipe and vent opening to seal and waterproof the installation. Ensure that the fan is connected properly to an electrical source if it is not solar-powered.
Incorporating these steps will greatly enhance the effectiveness of your roof ventilation system.
The Importance of Proper Ventilation in Your Home
Proper home ventilation, facilitated by devices such as roof vent fans, is essential for maintaining air quality and preventing moisture-related damage. When moist air accumulates within a home, it can cause condensation, which, over time, promotes mould growth and structural deterioration. Installing roof vents helps to expel this moist air and manage moisture levels effectively.
A roof vent fan, acting as an exhaust fan, enhances this process by actively pulling the moist air out of your attic and other high-moisture areas. This not only helps in reducing the potential for condensation but also maintains a balanced airflow throughout the home. Adequate ventilation thus ensures that indoor environments remain dry and healthy, mitigating risks associated with excessive moisture.
Moreover, efficient ventilation contributes to energy efficiency. By maintaining ideal indoor temperatures through proper venting, roof vent fans reduce the need for air conditioning during warmer months and heating during cooler months. This balance helps in reducing overall reducing energy consumption, which leads to lower utility costs and a smaller carbon footprint.
Consequently, the decision to install roof vents and incorporate an exhaust fan into your home’s design is not just a matter of improving air quality but also enhancing the home’s energy efficiency and sustainability.
Benefits of Installing a Roof Vent Fan
Installing a roof vent fan offers significant advantages, including enhanced air circulation and moisture control within your home’s attic and other enclosed spaces. By promoting the flow of cold air, these powered vents prevent the buildup of hot air during the summer and reduce the risk of moisture-related issues like mould and wood rot.
The installation of a roof ventilation fan can transform an underperforming attic space into an asset for maintaining the overall health of your home.
Here are three key benefits of adding a roof vent fan:
- Improved Temperature Regulation: During warmer months, a roof ventilation fan exhausts hot air out of the attic, facilitating the circulation of cooler air. This also contributes to a more comfortable indoor temperature but can also reduce the burden on your air conditioning system, potentially lowering energy costs.
- Moisture Control: By improving airflow, the roof vent fan effectively removes damp air and condensation that can accumulate in the attic. This exhausting process is vital for preventing the growth of mould and the deterioration of home-building materials.
- Extended Roof Lifespan: Consistent airflow helps to keep the attic’s temperature stable, which can reduce the thermal stress on roofing materials. Over time, this can extend the life of your roof by preventing warping and other damage caused by extreme temperature variations.
Step-by-Step Guide to Installing a Roof Vent Fan in Your Home
Installing a roof vent fan effectively requires careful planning and precise execution. Initially, it is essential to gather all necessary tools and materials to guarantee a smooth installation process.
Adhering to a step-by-step guide can help prevent common mistakes and make sure that the vent fan functions at its best in your home’s roofing system.
Gathering Tools and Materials You’ll Need
Before you begin the installation of a roof vent fan, make sure you have all necessary tools and materials readily available. Proper preparation can greatly simplify the process, ensuring a smooth and efficient installation. The key to a successful installation depends on the precision of your work, which is heavily dependent on having the right tools and materials at hand.
- Drill and Drill Bits: A powerful drill is important for creating holes in the roof. Confirm you have a variety of drill bit sizes to match the screws and other fittings.
- Screws and Mounting Hardware: Durable screws and appropriate mounting hardware are necessary to attach the fan to the roof securely. Verify the compatibility of the screws with both your roof material and the fan.
- Saw or Cutter: To create the vent opening, you will need a robust saw or a specialized cutter designed for cutting through roofing materials.
Additionally, gather sealant for waterproofing, a measuring tape for precise placement, and safety equipment such as gloves and goggles. Having these tools and materials organized beforehand will streamline the installation process of your roof ventilation fan.
Step-by-Step Guide to Install Roof Vents
Having gathered all the necessary tools and materials, follow these detailed steps to install a roof vent fan in your home successfully. Begin by consulting the installation instructions for your roof vent fan. These guidelines will specify the exact location and size of the hole for the vent.
Using a saw, carefully cut a hole in your roof according to these dimensions. Once the hole is prepared, position the roof ventilation fan over it, ensuring it fits snugly. Secure the fan in place by screwing it into the roof structure, as directed by the installation instructions.
Focus on the fan’s edges during installation. Use a high-quality sealant to seal around the edges, which helps prevent water infiltration and enhances the waterproofing of your installation.

Common Mistakes to Avoid During Vent Installation
To guarantee a successful roof vent fan installation, it is important to avoid several common errors that can compromise both functionality and safety. A careful approach is essential to make sure that the vent functions properly and does not lead to future problems.
Here are three critical mistakes to avoid:
- Failing to Clear the Area of Debris: Before you cut the hole for the vent, it’s important to clear any debris from the area. Sawdust, leaves, and other materials can obstruct the vent, which hampers its ability to clear the air effectively.
- Incorrect Placement of Shingles: Be careful not to nail through the roof or disrupt the placement of the shingles above the vent. Proper shingle alignment ensures that water does not seep into the roof, preventing water damage and maintaining the integrity of your roof structure.
- Neglecting to Create a Wooden Frame: When you cut the hole in the roof, you need a vent that is supported properly. To prevent the vent from sagging or becoming blocked, create a wooden frame around the opening to provide structural support and maintain an open area for air passage.
Pay close attention to these details to ensure a safe and effective installation.
How to Cut the Hole for the Roof Vent Fan
Cutting the hole for a roof vent fan requires precise planning and careful execution. First, identifying the ideal location on the roof is crucial to guarantee effective ventilation and avoid structural weaknesses.
Utilizing tools such as a jigsaw, it’s important to follow safety protocols to achieve clean and accurate cuts.
Identifying the Best Location on the Roof
Before cutting a hole for a roof vent fan, it is essential to determine the most suitable location on the roof, ensuring ideal airflow and structural integrity. Selecting the right fan location is vital for maximizing the efficiency of the vent installation.
Here are key considerations for placing your roof ventilation fan:
- Accessibility and Safety: Choose a location that allows safe and easy access for future maintenance. Confirm it is not near any structural supports or electrical wiring that could complicate the installation or pose hazards.
- Airflow Optimization: Center the vent in an area that will facilitate ideal airflow. This often means installing it near the highest point of the roof but away from any other obstructions like chimneys or other vents that could disrupt the air intake or exhaust.
- Structural Suitability: Before you drill a pilot hole, verify that the chosen spot on your existing roof does not intersect with critical structural elements such as trusses or rafters. Use a stud finder to avoid these features beneath the roof surface.
Using a Jigsaw and Other Tools Safely
Once the best location for the roof vent fan has been determined, carefully mark the dimensions of the vent on the roof using a chalk line or marker to prepare for the cutting process. Begin the steps to install the roof vent by drilling four holes at each corner of the marked area using a suitable drill bit. These holes are critical as they provide starting points for cutting with the jigsaw.
For the installation of the roof vent, it’s important to select the right jigsaw blade. A blade designed for cutting through your specific roofing material will guarantee a clean and precise cut. Insert the jigsaw blade into one of the pre-drilled holes and carefully follow the marked lines. Keep the tool steady to maintain control and accuracy around the vent area. This precision is vital for the proper fit and function of the roof vent fan.
Safety during this process cannot be overstated. Always use proper protective equipment, including gloves and goggles. Make sure the jigsaw is securely held and that you are stable on the roof. Following these guidelines not only facilitates the installation process but also helps ensure safe and effective use of the fan after installation.
How to Ensure Proper Ventilation After Installation
Once the roof ventilation fan and vent are installed, it is important to verify that the system operates efficiently to maintain ideal air quality and temperature control. Regular checks on airflow can help detect any performance issues, ensuring the system remains effective.
Additionally, maintaining your roof vent fan is crucial for extending its lifespan and avoiding expensive repairs.
Checking Airflow and Efficiency
After installing your roof ventilation fan and roof vent, it is crucial to verify that the airflow is unobstructed and the system operates efficiently. Proper airflow ensures that moist air from the bathroom and other areas efficiently exits your home, which is particularly important in cold climates where trapped moisture can condense and cause issues.
To verify that your roof ventilation system functions at its best, consider the following steps:
- Check for Blockages: Regularly inspect the soffit, ridge, and gable vents for any debris or blockages that might impede air flow. It’s important that air can flow freely from soffit vents through to ridge or gable vents.
- Measure Airflow: Use an anemometer to measure the air speed at various points in the ventilation path. This will help you determine if the amount of ventilation you need matches the system’s capacity.
- Assess Vent Placement: Ensure that the placement of your roof ventilation fan allows for the most effective expulsion of air. The fan should be positioned to pull air from all over the house, facilitating the escape of air through the designated exhaust points effectively.
These steps help maintain an efficient, moisture-free environment in your attic and home.
How to Maintain Your Roof Vent Fan
Maintaining your roof vent fan regularly is key to ensuring it continues to facilitate proper ventilation in your home. To keep your roof ventilation fan functioning properly, it’s vital to perform routine maintenance tasks. These not only help in preventing condensation but also boost the operational efficiency of your system.
Here’s a straightforward maintenance schedule to help you make sure everything is running smoothly:
| Task | Frequency | Purpose |
|---|---|---|
| Inspection | Bi-annual | Check for damage, blockages, and wear. |
| Cleaning | Annual | Remove debris and dust to maintain airflow. |
| Motor Check | Annual | Make sure the motor functions efficiently. |
| Vent Clearance | As needed | Clear any external blockages around the vent. |
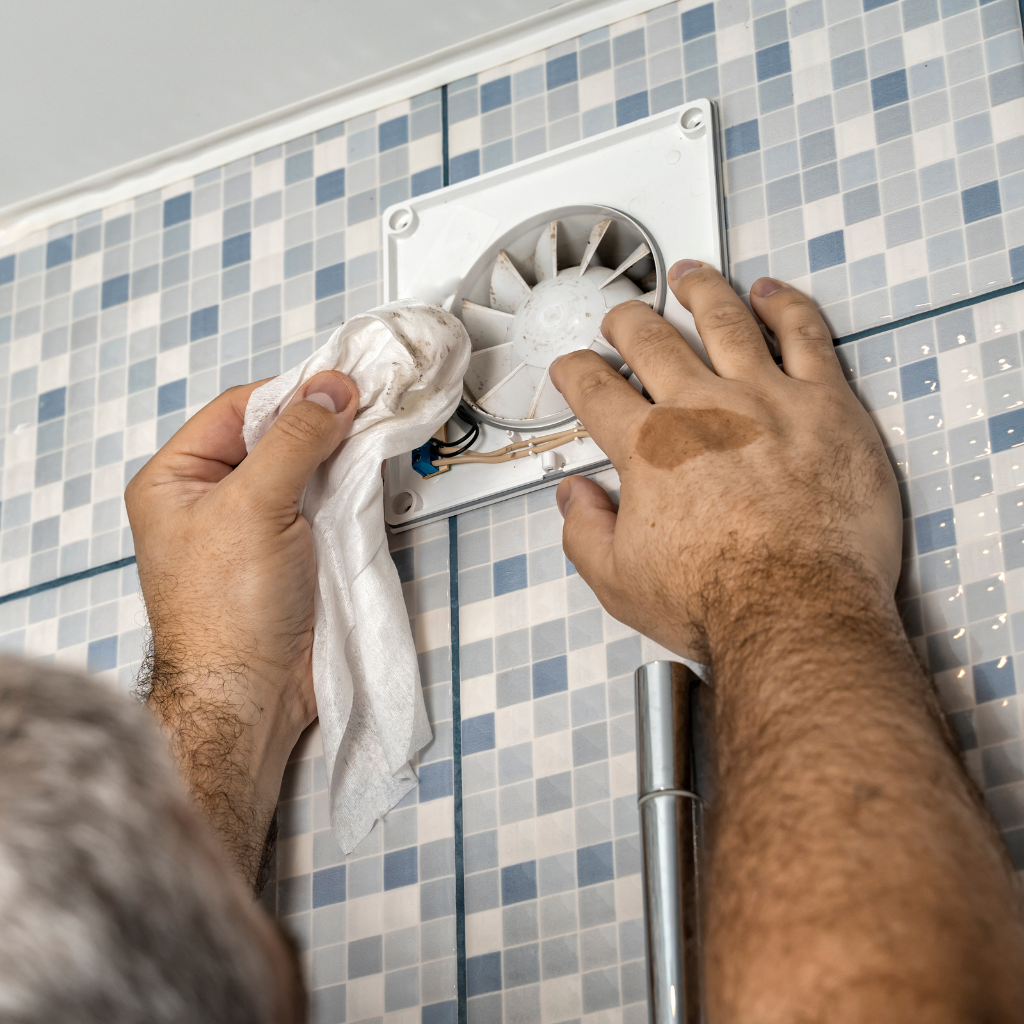
Regular inspections are crucial; they help identify any issues early, potentially saving on costly repairs. During cleaning, please focus on the fan blades and the motor, as accumulated dirt can hinder their performance. If the motor shows signs of wear or noise, consider consulting a professional for a more thorough examination.
Can You Install a Roof Vent Fan in a Bathroom?
Installing a roof vent fan in a bathroom is an important project that can greatly enhance air quality and moisture control. Before proceeding, it is vital to understand the specific conversion needs of your bathroom to guarantee compatibility and effectiveness.
This discussion will cover the essential steps to install a fan on a bathroom roof and how to select the most appropriate fan model for your space.
Understanding Bathroom Conversion Needs
Many homeowners often wonder whether it is feasible to install a roof vent fan in a bathroom to enhance ventilation. The short answer is yes, but several factors need to be taken into account to ensure efficient functionality and avoid structural issues.
Installing a roof vent fan can be an effective solution to exhaust warm air and moisture from your bathroom directly outdoors, preventing mould and structural damage.
Here are key considerations:
- Space and Insulation: Make sure there is adequate space on the roof for installing a vent fan. The roof structure should support the fan, and proper insulation around the ductwork is essential to prevent energy loss and condensation issues.
- Ventilation Needs: Calculate the bathroom’s cubic feet per minute (CFM) requirements based on its size and the fan’s capacity. This will help in selecting a fan that can efficiently handle the air volume without being overworked.
- Duct Routing: The effectiveness of a roof vent fan also depends on the ductwork layout. Shorter and straighter duct paths will enhance the fan’s ability to expel moist and warm air effectively.
Selecting the right fan and considering these aspects will ensure efficient ventilation and prolonged integrity of your bathroom and roof structure.
Steps to Install a Fan in a Bathroom Roof
Having explored the considerations for installing a roof vent fan, let’s now outline the steps necessary to implement this solution in a bathroom roof.
First, assess the size of your attic to confirm it can accommodate a roof-mounted bathroom fan. Please select a location on the bathroom ceiling where the fan should be installed and mark it.
Next, inside the attic, position yourself directly above the marked spot. Carefully cut a hole through the ceiling and roof from inside the attic. This is where you will lower the fan through the roof. Make sure the opening is sealed and waterproof to prevent any leaks.
Then, consider installing the fan unit. Secure it in place by using screws and brackets as required. Drive a nail or screw through the roof from the outside to help pinpoint the exact location, which aids in aligning the fan correctly with the roof opening.
Choosing the Right Fan for Your Bathroom
Selecting the appropriate roof vent fan for your bathroom is crucial to guarantee effective ventilation and moisture control. The selection process involves several key factors to ensure that the chosen fan meets the specific needs of your space and supports a good bathroom environment.
To assist in picking the best roof ventilation fan, consider the following factors:
- Cubic Feet Per Minute (CFM) Rating: This measures how much air the fan can move per minute. Select a fan with a CFM rating that matches the size of your room. A general rule is to have 1 CFM per square foot of room area.
- Integration with Existing Roof Features: Ensure the fan’s flange can seamlessly integrate with your roof’s existing features. Proper installation helps prevent leaks and maximizes the fan’s efficiency. Consider whether you can install the fan directly or if modifications are necessary.
- Additional Features: Look for features like built-in mesh to act as an intake barrier against debris and pests. Advanced models also offer humidity sensors or timers, enhancing the fan’s utility and energy efficiency.
Conclusion
In summary, the installation of a roof vent fan greatly enhances a home’s environmental quality by improving air circulation, regulating temperature, and controlling moisture levels. Careful installation, including precise cutting and secure fitting, is essential for top performance. Checking for exposed nails post-installation ensures a durable, leak-free system.
Post-installation, maintaining clear ventilation pathways guarantees sustained efficacy. Additionally, the adaptability of roof vent fans for use in various home areas, such as bathrooms, further underscores their utility and importance in residential settings.


