

Are you noticing your roof’s edge looking worn or water-damaged? It might be time to consider how to install roof fascia boards and replace fascia and soffits. These parts of your roof play a key role in safeguarding your home from the elements.
A fact worth sharing: properly installed fascia and soffits can significantly extend the life of your roof by preventing water damage.
This article will take you through each step, from preparing the roofline for new installations to choosing the right materials and tools. By following our advice, you’ll ensure that your house stays dry and looks its best.
Get ready to give your home a boost!
How to Install Fascia Board on Your Roof?
Installing a fascia board on your roof protects the edge from water damage and supports your gutter system. This guide will help you through the process step by step.
- Start by inspecting the existing fascia along your roofline for any signs of damage. Look for rot, pest infestation, or areas where the board has come loose.
- Measure the length of the area where you will install new fascia boards using a tape measure. Note down these measurements to cut your boards accurately.
- Choose the right material for your fascia boards. UPVC fascia is popular due to its durability and low maintenance requirements compared to timber.
- Cut the fascia boards to length with a saw, preferably a miter saw, for precise angles, especially at corners where you might need a 45-degree cut.
- Safely remove old fascias using a pry bar and hammer gently, ensuring the underlying surface is not damaged eaves or shingles.
- Check rafters for any signs of damage or rot that may need repairing before installing new boards.
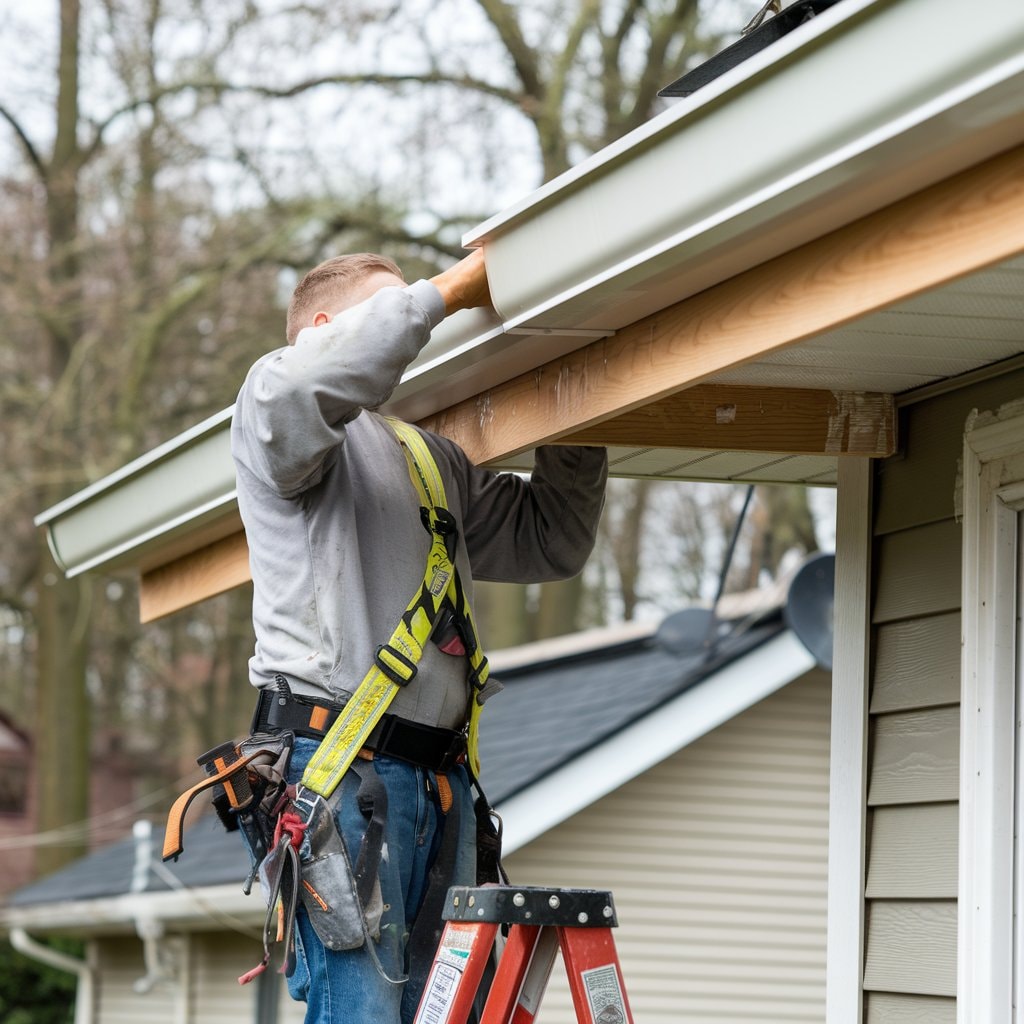
- Position the first row of the new fascia board at the correct angle and height along the roof edge, ensuring it’s level.
- Use stainless steel nails with a hammer or nail gun to fix the top of the fascia board into place along each rafter foot.
- Install soffit bearers between rafters if necessary before fitting soffit boards for ventilation beneath your roofline.
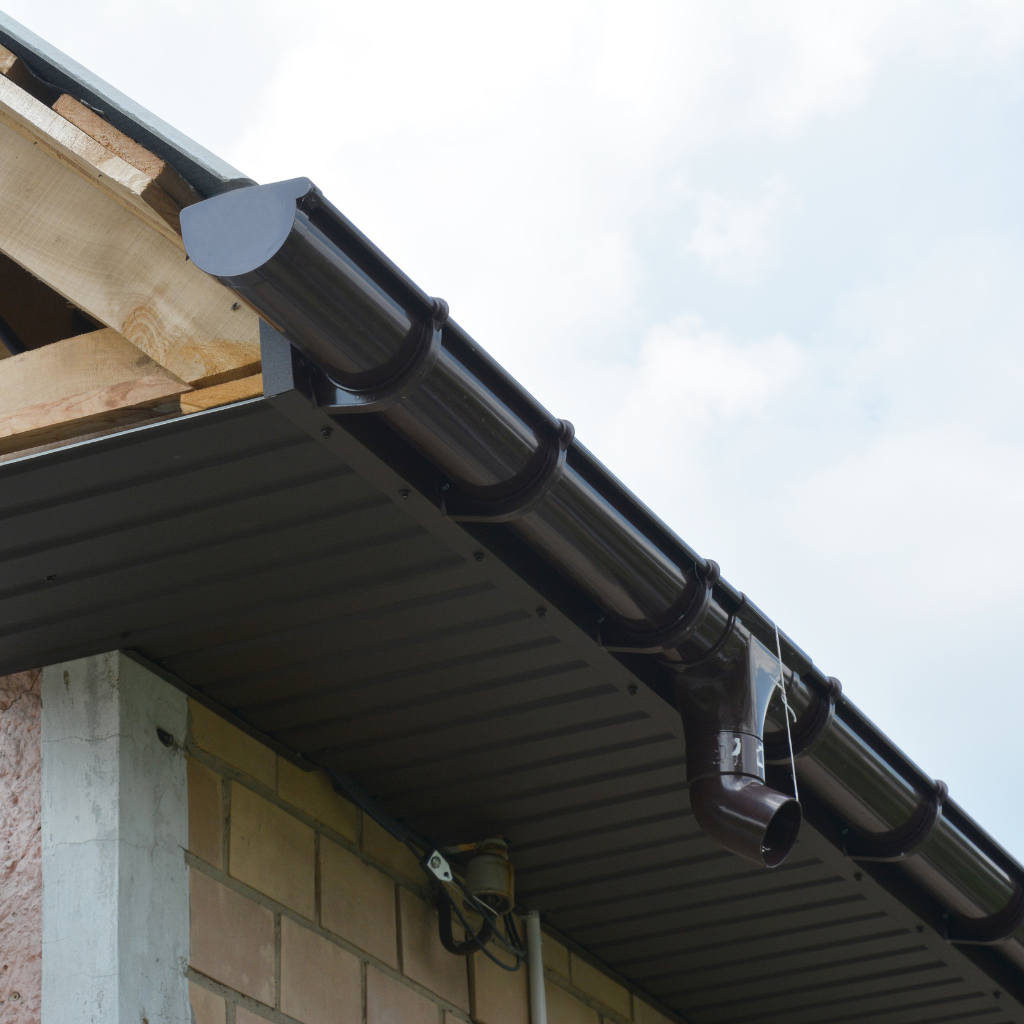
- Ensure proper alignment of gutter brackets on top of installed fascia boards, as they are essential in guiding rainwater away from your home’s foundation.
Make sure all joints between individual pieces of fascia are tight and secure against each other to prevent moisture from entering behind them.
Measuring and Cutting the Fascia Boards
Measuring and cutting the fascia boards correctly is crucial for a neat finish on your home’s roofline. First, use a measuring tape to determine the length of fascia needed along the edge of the roof.
It’s important to follow the manufacturer’s instructions to avoid mistakes. After measuring, mark the lumber with a pencil where cuts are necessary. Ensure each piece fits properly before proceeding to the next step of installation.
To trim the boards, a circular saw or table saw works best, depending on what you have available and your comfort level with power tools. Cut each board at a 45-degree angle at joints to ensure they fit tightly together and look professional once installed.
Boards should not exceed lengths that leave them exposed without support; typically, this means not longer than 300mm between supports for UPVC fascias and slightly more for timber fascias if following specific guidelines.
Precise measurements and careful cutting are key steps in achieving durable and visually appealing roofline finishes.
Properly Aligning and Nailing the Fascia
Proper alignment and secure attachment of the fascia are vital steps for a presentable and functional roofline of your home. Initial steps include firmly positioning the fascia board against the rafters or truss ends.
By using a spirit level, one can confirm alignment along the roofline to prevent any unattractive dips or increases. This thorough method protects against water accumulation, which could cause damage over time.
For the secure attachment of the board, make use of 2 x 65mm A4 stainless steel nails at each rafter foot. These nails offer resistance against rust and ensure strong holding power, which is crucial in counteracting harsh weather conditions.
Place them correctly, at not more than 600mm apart, in order to avoid warping or sagging of the fascia boards installed on your home. After nailing in place, verify that all joints between boards are tight and leveled to prevent moisture intrusion.
Finally, you are prepared to progress to the installation of soffits and ensure adequate ventilation below your roof.
Installing Soffits and Ensuring Ventilation
After accurately aligning and nailing the fascia, the next critical step involves installing soffits and ensuring proper ventilation. This process is vital for maintaining a healthy roof structure.
- Start by measuring the space between the fascia board and the roof truss to determine the size of the soffit required.
- Choose the right material for your soffits; UPVC soffits and soffits made from vinyl or aluminum are preferred choices because of their durability and ease of maintenance.
- Cut your chosen soffit material to size using a circular saw, ensuring you wear protective gear to prevent injuries.
- Install ventilators at regular intervals along the soffit length if your setup requires them for added airflow; this helps prevent moisture build-up, which can lead to rot.
- Fasten the soffit panels using 2 x 65mm A4 stainless steel screws, spacing them at a maximum of 600mm apart for stability.
- For houses with flat roofs or where extra ventilation is needed, consider installing a fascia ventilator for enhanced air circulation.
- Use string lines to keep your installation straight and evenly spaced throughout the entire length of the roofline.
- Ensure that any existing felt on your roof does not block new ventilation spaces created by your installed soffits; trim or fold back feet where necessary.
- Check that all installed parts are secure, and cover any exposed ends with appropriate caps or sealant to protect against water ingress.
Always follow building regulations carefully and use guard rails or a full scaffold platform when working at heights to ensure safety throughout the installation process.
How to Prepare the Roofline for Fascia Board Installation?
Preparing the roofline for fascia board installation is critical for ensuring a stable and lasting fit. This process involves inspecting and removing old components, along with making sure the roof is in good condition to support the new fascia.
- Inspect the existing fascia and roofline carefully. Inspect for any signs of rot, damage, or wear that could affect the new installation.
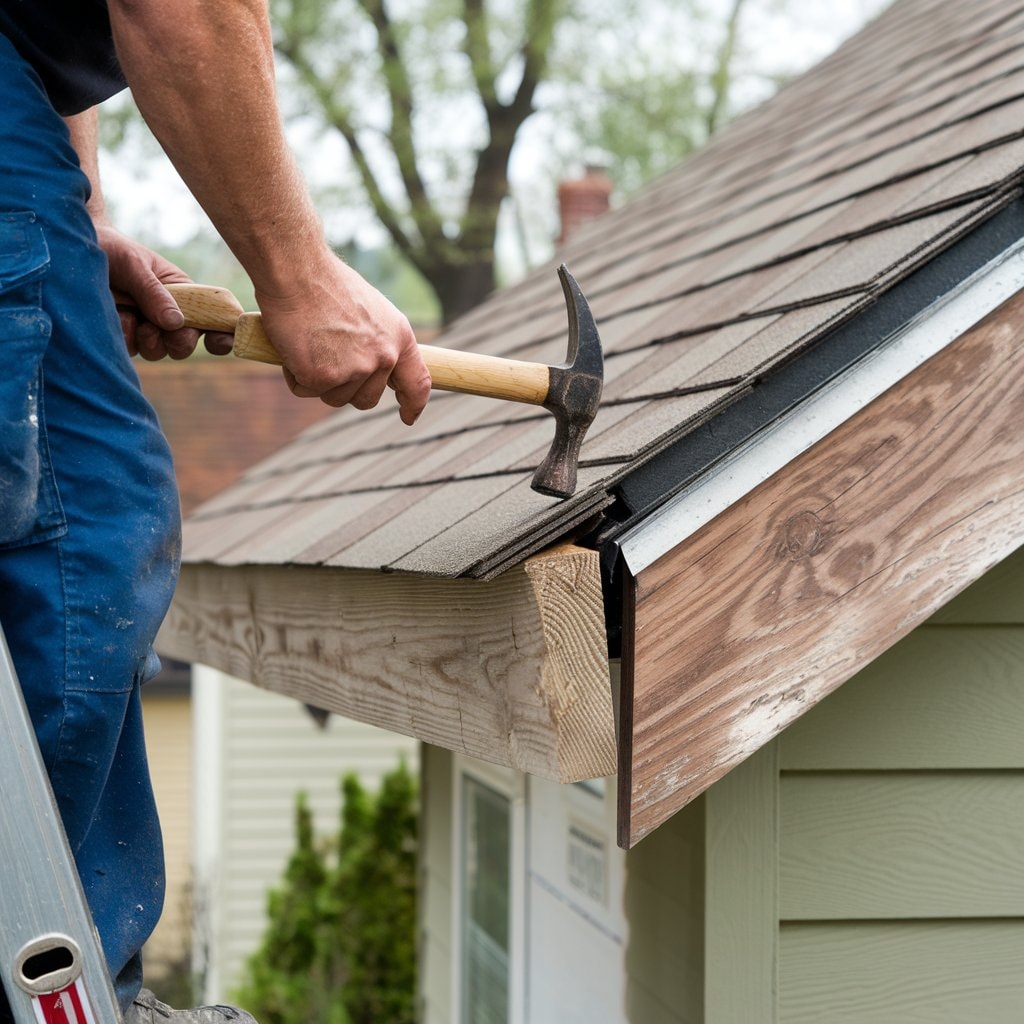
- Safely remove old fascia boards using a pry bar and hammer. Handle the roof tiles with care to avoid damage or underlying structures.
- Check the exposed edges of the roof tiles. They should be intact and properly aligned along the length of your home.
- Examine rafter feet for any signs of deterioration. These need to be solid to hold the fascia firmly in place.
- Ensure all necessary repairs on damaged sections are completed before proceeding. This might include replacing broken roof tiles or fixing rafter feet.
- Clean the area thoroughly after removing old gutters and fascia boards. Remove any debris, dust, or nests that may have accumulated.
- Measure along the length where new fascia boards will be installed to ensure you cut them to the right size later on.
- Check if you may also need to replace soffits or rain gutters as part of this process. It’s easier to do these jobs together.
- Plan for ventilation in your soffit installation if required, which is crucial for preventing moisture buildup under your roof.
Following these steps helps protect your home by ensuring that your new UPVC fascias and soffits are installed on a sound, clean base, effectively enhancing both their function and aesthetic appeal while protecting against water exposure and pest infestations.
Inspecting the Existing Fascia and Roofline
To keep your home secure and aesthetically pleasing, inspecting the existing fascia and roofline is crucial. Start by looking for signs of damaged fascia. If boards are cracked, rotting, or missing, they need replacing straight away.
Moisture exposure often leads to these issues, so checking areas where water collects is vital.
Regular inspection prevents small problems from becoming big headaches.
Use a ladder to get a closer view, but make sure it’s stable and at the appropriate height. Look along the roofline for any gaps in the fascia joints that could let in pests or more moisture.
Removing Old Fascia Boards Safely
Removing old fascia boards requires careful steps to ensure safety and prevent damage to the roofline. First, use a pry bar to gently remove nails or screws securing the fascia in place.
Doing this carefully prevents tearing off materials attached to the roof or wall. Wear gloves and eye protection since pieces of wood or metal can fall during removal. Once you’ve loosened the fascia, pull it away from the structure without forcing it, as this might break parts of your roof.
Check for signs of rot or damage on the board behind where the old fascia was fixed. This inspection will show if any additional repairs are necessary before installing new fascia boards.
The next step involves getting your roof ready for these new installations.
Ensuring the Roof is Ready for New Fascia
Before installing new fascia boards, it’s crucial to inspect the roofline and ensure it’s in good condition. Look for signs of rot or damage where the existing fascia meets the roof.
This check is essential as any issues can affect the new installation. Secure loose tiles and repair any parts of the roof that might cause problems later on. This step prepares your home for durable, new fascia boards.
After making sure everything is set, choosing the right materials becomes the next priority. The type of fascia you select—whether timber, uPVC, or another material—will influence both aesthetics and longevity against moisture exposure.
What Tools and Materials Do You Need to Install Fascia Board?
Installing new fascia boards on your home improves both its appearance and protection against water damage. You’ll need the right tools and materials for a successful installation. Here’s what to gather:
- Circular saw: Use this to measure and cut timber fascia boards to the correct length.
- Tape measure: Essential for accurate measurements before cutting the boards.
- Hammer: Needed for nailing fascia boards securely in place.
- Nails: Choose galvanized nails to prevent rust and ensure a long-lasting fix.
- Ladder: A stable ladder is crucial for safely reaching the roofline.
- Safety goggles: Safeguard your eyes from dust and debris during cutting and installation.
- Dust mask: Wear this to avoid inhaling sawdust while working with timber boards.
- Spirit level: Ensures that installed fascia boards are perfectly horizontal.
- PVC or wooden fascia boards: Depending on the type of material you prefer, PVC is resistant to moisture, while timber may need preservative treatment.
- Soffit panels: These are installed under the roof edge; make sure they allow for adequate ventilation (architecture).
- Screwdriver or drill: For securing soffit panels and fascia with screws if preferred over nails.
- Capped screws: They prevent water ingress, making them ideal for attaching PVC fascias and soffits.
- Sealant: Apply around edges to block out moisture.
Ensure you buy quality materials that can withstand exposure to water and sunlight, like polyvinyl chloride (PVC) or preservative-treated wood, depending on your preference between synthetic or natural looks.
Selecting proper ventilation products is critical; without correct ventilation through soffits, attics can become damp, leading to structural issues.
Lastly, cleaning gutters before installing new fascias ensures that your drainage system works efficiently, reducing risks of water damage along the newly installed fascias and soffits.
Choose materials from reputable companies, such as construction supply stores, ensuring that you get high-quality products suitable for your home’s requirements.
Gathering these tools and materials prepares you well for replacing fascia boards on your home or undertaking a full replacement of the roofline with new upvc roofline systems for an updated look and better protection against the elements.
Choosing the Right Fascia Board Material
Selecting the right fascia board material plays a crucial role in your home’s protection and overall aesthetic appeal. You have options such as wood, vinyl, aluminum, and UPVC. Each material provides unique benefits based on your requirements.
Wood fascia creates a classic look but needs regular maintenance to avoid rot and damage from moisture. Alternatively, plastic boards like vinyl or UPVC provide durability with minimal upkeep and resist exposure to water effectively.
Aluminum stands out for its strength and resistance to corrosion, making it ideal for homes in harsh climates.
The choice of fascia board material significantly impacts both the longevity of your roofline and the visual charm of your home.
Moreover, considering fascia ventilation is important regardless of the chosen material to ensure proper airflow under the roof. This step guards against dampness that could lead to decay or mold growth within wooden boards or even affect other materials over time.
Before installing new fascia boards, removing nails from old ones safely ensures a stable deck for securing new installations. Always follow manufacturer instructions closely when replacing roofline components using tools available from retailers’ local hardware stores.
Understanding the Role of Soffits and Gutters
After choosing the right fascia board material, it’s crucial to understand how soffits and gutters work together with fascia. Soffits conceal the underside of your roof overhang, allowing for proper ventilation to your attic and protecting against water damage.
They play a key role in keeping your home dry and preventing dampness that could lead to mold. On the other hand, gutters collect rainwater from your roof and channel it away from your property, preventing erosion around the foundation.
Soffits also help in air circulation within attics and roof spaces. This is essential for maintaining a stable temperature in those areas during both summer and winter months. Properly installed soffits can save you money on heating and cooling bills by making sure air flows smoothly through vents.
Gutters safeguard your soil against waterlogging by ensuring rainwater drains correctly, thus reducing the risk of water seeping into basements or causing structural damage. Together with fascias, they create an efficient system that protects your home from weather-related issues while adding aesthetic value to the exterior design.
When Do You Need to Replace the Fascia Board?
You need to replace fascia boards when they show signs of damage, such as rotting, splitting, or water damage. These issues often occur because the boards are exposed to moisture for long periods.
If you notice paint peeling off your fascia, this can also indicate that the wood underneath is damaged and needs replacing. Vinyl or aluminum options might be a good alternative if you’re looking for materials that withstand moisture better.
Different types of fascia and soffits are available, offering various materials, including UPVC, which is known for its durability against weather elements. Before selecting new fascia boards, it’s crucial to assess the extent of damage and determine whether a full replacement is necessary or if repairs could suffice.
The replacement cost will differ based on the material used chosen and the size of your roofline.
Next, we’ll look into how to maintain these essential components to extend their lifespan.
Signs of Damage in Existing Fascia
Peeling paint and cracks in the fascia often signal moisture harm. This shows that water has managed to break through the defensive layer, potentially causing decay underneath. Watch for signs of drooping or disconnection from the roofline, as they can imply weakened structures triggered by prolonged exposure to water.
These faults undermine the strength of your roofing, and they could also contribute to pests making it their home.
Decay is another significant worry; it implies the fascia board requires immediate replacement. If not dealt with promptly, the decay spreads beyond just the fascia, impacting surrounding barge boards and soffits and threatening the overall roof’s stability.
Boards exposed to water for lengthy periods without proper drainage are particularly susceptible to this kind of harm. Always check for soft points or disintegrating regions along the fascia – these symptoms should be prioritized if your goal is to preserve a strong and resilient roof structure.
Understanding Different Types of Fascia and Soffits
Fascia and soffits play key roles in the architecture of a house. They protect the roofline and keep out unwanted pests while allowing the roof to breathe. Fascias come in various materials, including wood, vinyl, or aluminum.
Each has its benefits depending on your home’s needs and climate. Wood provides a timeless appearance but demands more upkeep to prevent rot. Vinyl fascias are popular for their durability and low maintenance.
Aluminum options offer strength with minimal maintenance.
Soffits help ventilate attics, preventing moisture build-up that could lead to mold problems. Like fascias, they come in different materials, such as vinyl or aluminum, which homeowners may choose based on durability and aesthetic preferences.
Understanding the different types of fascia boards available can significantly impact your home’s protection and curb appeal.
Evaluating Cost and Time for Fascia Replacement
Once you understand the various types of fascia and soffits available, it becomes crucial to assess the fascia board replacement cost and time involved. Costs can vary widely depending on materials such as vinyl or aluminum and the extent of the damage.
Vinyl boards are a popular choice due to their durability and ease of maintenance, which might affect pricing. The process may also use additional elements like batten or box ends, influencing both price and duration.
Replacing your roofline demands careful planning around your budget and schedule. For a standard home, installing new fascia boards can take several days to complete. It’s important to make sure that professionals with the right tools undertake this task to avoid delays.
Keep in mind that preservative-treated wood options could extend your project but offer long-term benefits against rot and pest damage. Homeowners should prepare for this investment by seeking detailed quotes from reputable service providers like Butler Roofing Services, ensuring they grasp both financial commitment and timeframe before starting installations or replacements.
How to Maintain Fascia and Soffits for Longevity?
Maintaining your fascia and soffits is essential for the longevity of your roofline. Regular checks and upkeep prevent rot pest damage and ensure proper roof drainage.
- Inspect your fascia and soffits regularly. Look for signs of wear or damage.
- Clean gutters regularly to avoid water backup and damaging the fascia.
- Check for blocked soffit vents that can cause attic ventilation issues.
- Replace any cracked or broken boards as soon as possible to avoid further damage.
- Apply a preservative-treated coating to the wooden fascia to protect against rot.
- Ensure nails and fasteners remain secure in the fascia and soffits; tighten or replace them as needed.
- Use a safe ladder to reach your roofline, avoiding unsupported ladders that can lead to accidents.
- Remove debris like leaves and twigs from soffits to maintain airflow.
- Choose vinyl or aluminum materials when replacing old boards for less maintenance.
- Follow instructions carefully if you’re installing new fascia boards yourself; consider watching YouTube tutorials for guidance.
By keeping an eye on these areas, you’ll ensure that both new fascia boards installed remain in good condition, preventing future repairs and preserving the aesthetic appeal of your home’s exterior.
Regular Inspection and Maintenance Tips
To ensure your fascia and soffits last longer:
- Carry out regular inspections.
- Inspect for signs of rot or pest damage every few months.
- If you detect any issues, resolve them quickly to avoid further deterioration.
For effective maintenance, clean gutters routinely to stop water from backing up and damaging the roofline.
Use a ladder safely to reach the fascia and soffits for close inspection. Replace broken or damaged sections as soon as possible.
This upkeep helps maintain the structural integrity of your roof and ensures efficient drainage away from your home’s foundation.
Preventing Rot and Pest Damage
Keeping fascia and soffits free from rot and pests plays a crucial role in maintaining your home’s structure. Frequent inspections can help detect early signs of damage. Homeowners should look for discoloration, soft spots on the wood, and any pest presence.
For prevention, ensure good ventilation through the soffits to keep the area dry, as moisture invites both rot and insects.
Use quality materials resistant to decay when you install new or replace the roofline. Treat wooden fascia with protective sealants to ward off water damage and termites. Metal or vinyl options offer long-lasting durability against pests without needing frequent treatments.
Cleaning gutters helps prevent water overflow that can lead to rot along the fascia boards.
Next, let’s discuss how regular cleaning impacts gutter health and roof drainage efficiency.
Cleaning Gutters and Ensuring Proper Roof Drainage
Cleaning gutters plays a crucial role in ensuring proper roof drainage. Gutters filled with leaves and debris prevent water from flowing away from your home, leading to potential damage.
Homeowners should clean their gutters at least twice a year to maintain effective drainage. This process involves removing all debris, flushing the gutters with water, and inspecting for any leaks or holes that need fixing.
Ensuring your roof has proper drainage also requires regular checks of downspouts and drainage pipes. Blockages in these areas can cause water to back up and damage your fascia, roofing material, or even your home’s foundation.
Use a plumber’s snake to clear any obstructions in downspouts. Always make sure water flows freely away from your house to protect its integrity against water-related issues.
Conclusion
Proper maintenance and timely replacement of fascia are crucial for the health of your home’s roof. Ensuring ventilation through soffits prevents rot and pest damage. By inspecting your fascia regularly, you safeguard against expensive repairs in the future.
Use a circular saw for precise cutting during installation or when you need to replace the fascia. This way, your roofing stays in top condition.
Picking the right materials and applying the correct methods and tools, like a circular saw, will make installing new fascia straightforward. Whether you’re starting to install or planning to replace the fascia, repeat this process carefully.
Always remove nails from old boards safely and ensure that each new piece is aligned properly before securing it. By doing so, you keep your house looking great and well-protected against weather damage.


