

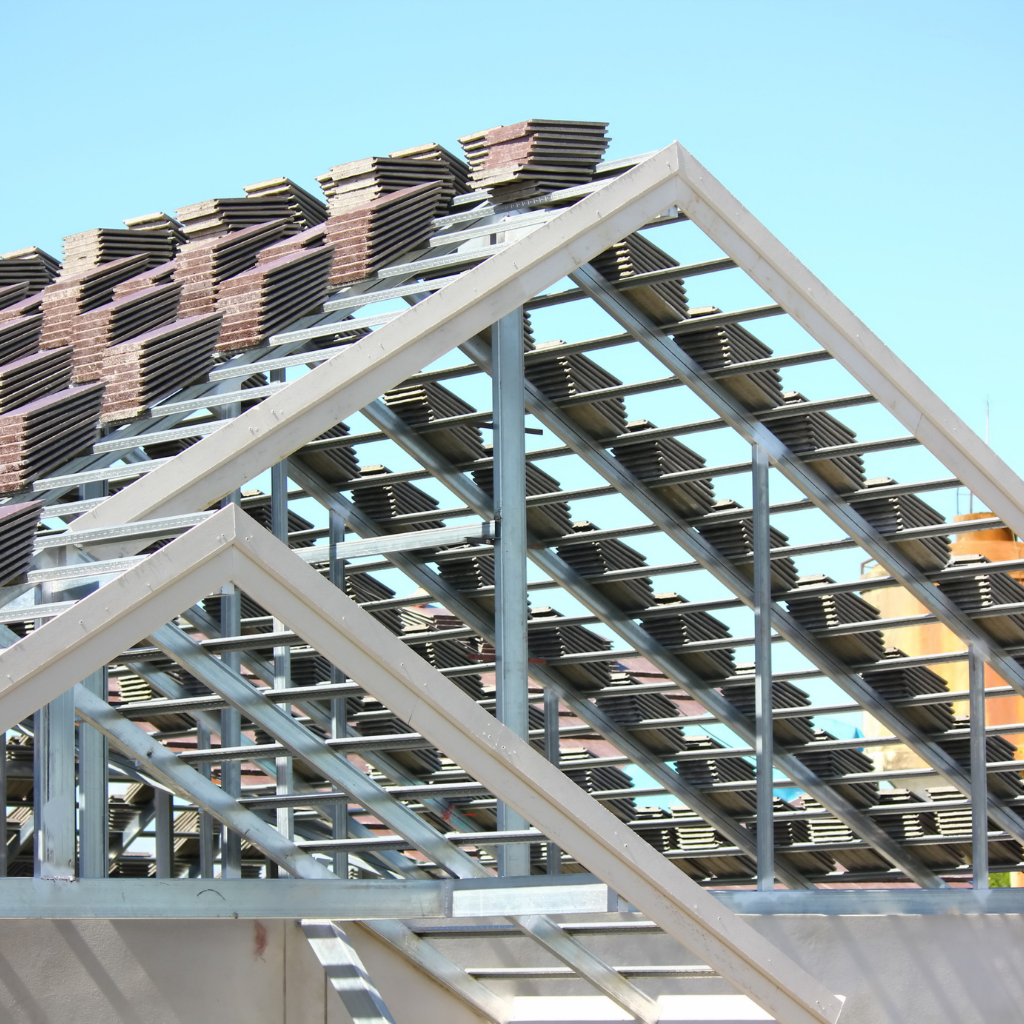
To install roof trusses effectively, start by placing the initial truss and ensuring it is plumb and well-braced, using marks on the wall plate for guidance. Secure each truss to the wall plate using appropriate fasteners, align them meticulously, and employ temporary and diagonal bracing to maintain stability. Also, connector plates are used to fortify joints and distribute loads evenly. Following these steps enhances the roof’s structural integrity and promotes long-term performance, offering profound insights into successful installation techniques.
What are the key steps to installing roof trusses?
Installing roof trusses begins with properly setting the first truss, ensuring it is perfectly plumb and secure, which serves as a reference for subsequent trusses.
The alignment and bracing of the trusses are critical to maintaining structural integrity and achieving a level roofline, especially when dealing with a vaulted ceiling, which requires careful spacing to accommodate the unique shape.
Finally, securely fastening the trusses to the corresponding wall plates stabilizes the entire roof structure against lateral and vertical loads.
How to Set the First Truss
Setting the first truss correctly is vital as it guides the placement of all subsequent trusses.
Begin by consulting the building code to guarantee compliance with local regulations. Prepare the site by marking the truss positions on the top plate of the load-bearing walls.
Lift the first truss into place, maintaining strict alignment with the layout marks. Secure this first truss with temporary bracing to stabilize it against wind and movement.
This bracing is essential for maintaining the truss’s position and integrity until permanent structural connections are made. Using a ladder or scaffolding can make this process safer and more efficient.
Roof truss installation tips often emphasize the importance of precision in setting the first truss, as it sets the precedent for the entire roof structure.
How to Align and Brace Trusses
After securing the first truss, it is essential to maintain alignment and add bracing as subsequent trusses are installed. Aligning trusses according to the truss design guarantees structural integrity and uniform load distribution.
Use a string line along the truss peaks to check alignment, adjusting each truss to confirm they are straight and evenly spaced. Measuring tape is essential in ensuring accuracy during this step.
Diagonal bracing is critical during crane installation; it prevents the trusses from swaying and secures them. Typically, 2×4 lumber is used for this purpose, attached from the first truss to at least every fourth truss thereafter along the top and bottom chords.
Proper bracing during the installation of trusses is vital to maintaining the structure’s stability and preventing future issues.
How to Secure the Trusses to the Wall Plate
Securing the trusses to the wall plate guarantees a roof structure’s stability and durability.
One must verify that the trusses and rafters are perfectly aligned to achieve this. Once aligned, each truss should be securely fastened to enhance the roof’s load-bearing capacity.
Use galvanized nails or structural screws to nail them to the wall plate, employing a nailing pattern that complies with local building codes. Using the wrong size connector plates can lead to weak joints and compromise the roof’s stability.
Each truss must be secured to prevent movement compromising the roof’s integrity. This process is pretty easy when following precise guidelines.
Properly securing the roof rafters not only supports the weight distribution across the structure but also contributes to the long-term resilience of the building.
How to Brace and Support Trusses During Installation?
During the installation of roof trusses, diagonal bracing plays a vital role in maintaining structural integrity by evenly distributing loads and preventing lateral movements.
Metal bracing is essential as it offers enhanced durability and resistance to environmental factors, ensuring its quality and long-term stability.
Proper installation of these bracing systems is fundamental for the safety and effectiveness of the roof structure. Additionally, utilizing struts can provide added reinforcement to the framework.

What is the Role of Diagonal Bracing
Diagonal bracing plays an essential role in maintaining the structural integrity of roof trusses during installation. This technique strategically places rafter diagonal bracing between trusses at predetermined locations to stabilize the structure.
This bracing supports the trusses while installing roofing materials and distributes load-bearing forces evenly, preventing structural deformations and ensuring long-term stability.
Additionally, permanent diagonal bracing is vital for maintaining the alignment and spacing of trusses, which is essential for roof performance and durability.
Why is Metal Bracing Important
Metal bracing is essential in the stabilization of roof trusses during installation, providing necessary support that guarantees the structure can withstand both the construction process and long-term environmental stresses.
Ensuring the integrity of the roof, metal bracing plays a significant role:
- Enhances Structural Integrity: Metal bracing reinforces trusses, preventing structural deformities during installation.
- Prevents Misalignment: Keeps trusses aligned correctly with bearing walls, which is vital for load distribution.
- Supports Load Distribution: Helps distribute weight evenly across the roof, reducing stress on individual trusses.
- Increases Safety: Minimizes risk of truss collapse during the installation process.
- Facilitates Installation: Stabilizes trusses until permanent fixtures and connections are completed, streamlining the installation process.
Common Mistakes to Avoid During Roof Truss Installation
When installing roof trusses, it is essential to avoid common errors that can compromise the structure’s integrity and safety.
Incorrect bracing, supplying inaccurate measurements, and failing to guarantee proper load distribution are pivotal areas where precision is mandatory.
Addressing these issues methodically can prevent structural failures and secure compliance with building codes.
How to Prevent Incorrect Bracing
Guaranteeing proper bracing during roof truss installation is critical to the roof’s structural integrity and the installation process’s safety.
Incorrect bracing can lead to structural failures and safety hazards. Here are key strategies to avoid such errors:
- Verify Alignment: Confirm trusses are aligned vertically before any truss brace is installed.
- Temporary vs. Permanent: Distinguish between temporary supports and permanent braces, applying each correctly.
- Longitudinal Bracing: Install longitudinal bracing to stabilize trusses against lateral movement.
- Sequential Installation: Follow the correct bracing sequence outlined in the truss design plans.
- Professional Consultation: Consult a structural engineer when bracing requirements or methods are uncertain.
How to Avoid Supplying Incorrect Measurements
Following the proper bracing techniques, the next step in guaranteeing a successful roof truss installation involves accurate measurement.
One common mistake in building projects is supplying incorrect measurements, which can lead to significant structural issues, particularly in load-bearing elements. To avoid this, always double-check the dimensions of each truss and the corresponding spans in your plans. Use precise measuring tools and verify measurements at multiple stages of the construction project.
Ensure that all team members understand the importance of accuracy and have training to correctly read and interpret construction drawings. Additionally, maintain open communication with your truss manufacturer to confirm specifications and resolve any discrepancies before the trusses are fabricated and delivered.
This diligence prevents costly errors and delays in your building project.
How to Ensure Proper Load Distribution
To guarantee proper load distribution during roof truss installation, it is fundamental to address common mistakes that can compromise the roof’s structural integrity.
Confirming that trusses are engineered with precision and correctly implemented is essential. Here are key missteps to avoid:
- Improper Spacing of Trusses: Not adhering to the specific design spacing can lead to uneven load distribution.
- Incorrect Installation of Connector Plates: Ensure these are securely attached, as they play a critical role in load transfer.
- Failure to Check Alignment: Misaligned trusses can cause unequal stress and potential structural failure.
- Neglecting Temporary Bracing: This is crucial during installation to maintain stability.
- Overloading Trusses During Construction: Avoid placing heavy materials on trusses before the entire roof system is secured.
When installing roof trusses, it is vital to adhere to specific guidelines to promote the longevity and safety of the roof. If trusses are initially assembled on the ground before lifting them into place, installation can be more precise.
How do you use connector plates in roof truss installation?
Connector plates are vital for enhancing the stability of roof trusses by securely joining the wooden elements under high pressure.
Proper placement of these plates is essential, as well as adhering to manufacturer guidelines to guarantee ideal load distribution and structural integrity.
During installation, inspecting these plates for any signs of damage or wear is imperative to prevent future structural failures.
How Do Connector Plates Enhance Truss Stability
While roof trusses are designed to provide structural support, connector plates greatly enhance the stability of these components.
These plates are essential in maintaining the integrity and longevity of roof structures. Here’s how they contribute:
- Distribution of Load: Connector plates help distribute the load evenly across the truss, reducing stress on individual joints.
- Enhancing Joint Strength: They increase the strength and stiffness of the joints, which is vital for truss stability.
- Prevention of Structural Shifts: Guarantees trusses remain aligned and stable, particularly at the gable end.
- Simplifying Installation: Facilitates faster and more accurate truss installation.
- Adaptability: They adapt to various truss configurations and designs, improving overall structural resilience.
What Are the Best Practices for Placing Connector Plates
Proper placement of connector plates is critical for maximizing the effectiveness and stability of roof trusses.
When installing connector plates, it is essential to first mark the truss positions accurately for alignment in the vertical plane. This guarantees that the weight of the roof is evenly distributed across all trusses, including specialized designs like the scissor truss.
Position each connector plate precisely where the truss meets its corresponding support, securing them firmly to prevent shifts under load.
When adding a second truss, verify that the connector plates do not overlap improperly, which could compromise the truss integrity.
These meticulously followed steps guarantee a robust framework capable of withstanding environmental stresses and the roof’s weight.
How to Inspect Connector Plates for Damage or Wear During Installation
As previously discussed, after verifying that connector plates are correctly positioned, the next step is to thoroughly inspect these components for any signs of damage or wear before proceeding with the installation.
This inspection guarantees the roof trusses’ structural integrity and safety once installed.
Here are essential tips for inspecting connector plates:
- Check for Cracks: Look for small cracks or breaks on the plate surfaces.
- Inspect Edges: Ensure the edges are not bent or distorted, which can compromise fitting.
- Look for Rust: Any signs of rust could weaken the connector plates.
- Verify Plate Alignment: Misalignment can lead to structural weaknesses.
- Assess Plate Thickness: Confirm that the thickness meets the specified standards for your project.
What Are the Best Roof Truss Installation Tips for Beginners?
When installing roof trusses, beginners should meticulously consider factors like environmental loads and the truss design to guarantee structural integrity.
Keeping trusses aligned is essential; a string line along the top chords can maintain consistent alignment across the structure.
Proper spacing and placement are secured by closely following the engineered truss layout plan, which prevents future structural issues and maintains load distribution.
What to Consider When Installing Trusses
Before initiating the installation of roof trusses, beginners should first understand the significance of precise spacing and alignment. Proper installation is essential in the home building process, guaranteeing structural integrity and longevity.
Here are key considerations:
- Verify Truss Design: Confirm that the trusses match the architectural plans.
- Inspect for Damage: Check each truss for transport or manufacturing damage before installation.
- Understand Load Paths: Recognize how weight is distributed across the rafters to guarantee stability.
- Use Appropriate Tools: Utilize the correct lifting equipment to prevent structural damage.
- Consult Professionals: Engage experienced builders for guidance and to verify installation techniques.
These steps help safeguard against common pitfalls in installing roof trusses, enhancing safety and effectiveness.

How to Keep the Trusses Aligned
Guaranteeing that roof trusses remain aligned during installation is critical for maintaining structural integrity and achieving ideal load distribution.
Begin by positioning the first truss as accurately as possible, as it sets the precedent for subsequent trusses. To keep all the trusses aligned, it’s crucial to monitor the chord of each truss, preventing any deviation that leads to bowing out of the vertical.
Utilize bracing techniques that not only support the trusses during installation but also assist in maintaining a straight and uniform alignment across all trusses.
Regularly check alignment from various angles, adjusting immediately if any misalignment or bow is detected. This methodical approach helps prevent structural issues and guarantees a sturdy, well-aligned roof framework.
How to Ensure Proper Truss Spacing and Placement
Proper spacing and placement of roof trusses are fundamental to guaranteeing a stable and durable roofing structure.
When installing roof trusses, it is vital to adhere to specific guidelines to promote the longevity and safety of the roof. Here are essential tips to guide beginners:
- Consult Building Codes: Verify truss spacing complies with local building regulations.
- Use Truss Spacing Guides: Employ manufacturer-provided guides to determine ideal spacing.
- Align with Rafters and Ceiling Tie Members: Confirm alignment for structural integrity.
- Regular Intervals: Place trusses at consistent, measured intervals to distribute weight evenly.
- Cross-Check Measurements: Double-check spacing and placement before securing trusses to prevent future complications.
Conclusion
In summary, properly installing roof trusses is essential for structural integrity. Key steps include careful placement, accurate spacing, bracing, and meticulous use of connector plates. Avoiding common pitfalls such as improper spacing and inadequate securing is vital. Beginners should prioritize detailed planning and seek expert advice when necessary. Adhering to these technical guidelines guarantees a safe and sturdy roof framework, essential for longevity and safety.


