

Many homeowners often find their houses too warm in summer or face moisture problems in the attic. This could be due to poor roof ventilation. A well-installed roof ventilator can solve these issues by letting hot air escape and reducing moisture buildup.
One interesting fact is that proper roof ventilation extends the life of your roof by preventing ice dams and other damage caused by trapped moist air.
This blog post will guide you through how to install roof ventilator, including choosing the right type for your home and ensuring it’s correctly positioned for maximum efficiency.
You’ll learn about different types of vents, such as ridge vents, soffit vents, and turbine vents. Plus, we’ll cover how many vents your roof needs to maintain a healthy home environment.
Please keep reading to make your home more comfortable and protect its structure.
How to Install a Roof Vent: Step-by-Step Installation
Moving from understanding the basics of roof vents, we now delve into how to install a roof vent. This guide is designed for homeowners, decorators, builders, and contractors looking to ensure proper ventilation in homes.
- Check local building regulations before starting any work. This ensures compliance with specific requirements for your area.
- Gather all necessary tools and materials. You will need a saw, drill, roofing nails, sealant, and, of course, the roof vent.
- Measure your Roof space to determine how many roof vents you need. Proper attic ventilation requires one square foot of vent area for every 150 square feet of attic space.
- Select the type of roof vent that best suits your needs. Ridge vents, static, turbine vents, and soffit vents are common options.
- Find the right location on your roof to install a roof vent. It should be close to the roof ridge vents for maximum efficiency.
- Mark out where you will carefully make the hole for the new roof vent.
- Cut a hole in your roof with a saw, following the markings accurately.
- Place the vent into the hole, ensuring it fits snugly.
- Secure the roof vent with roofing nails, making sure it’s stable.
- Apply sealant around the edges of the vent to prevent water from entering.
- Install flashing around the base of the vent if required for extra waterproofing protection.
- Double-check everything is secure and properly sealed.
This process guarantees that your home remains well-ventilated, addressing issues like trapped moisture and warm air effectively while also potentially reducing energy bills by improving your home’s overall efficiency in temperature building regulations.
Gathering Necessary Tools and Materials
Before initiating the procedure of installing roof vents, it’s crucial to have all the necessary equipment and materials ready. You will require a saw for creating an opening in your roof deck, a pry bar for displacing any surrounding shingles, and nails or screws for securing the vent.
Also, ensure you have a sealant to prevent water seepage around the new vent installation. Safety gear is imperative; verify you have a stable ladder, safety harness, and gloves for personal protection during the project.
Keeping the right equipment and materials prepared before commencing your roofing project saves time and assures a more efficient installation process – Butler Roofing Services.
Preparing Your Roof for Installation
Clearing the area is your first step in getting your roof ready for new vents. Remove any debris, leaves, and loose materials from your existing roof to ensure a clean workspace. Check for old nail holes or damage that could interfere with the installation of your new vent.
Repair these areas to prevent future leaks.
Next, measure the size of your roof to determine how many vents you will need for adequate ventilation. The amount of ventilation required depends on the size and type of your roof.
Use a tape measure to find the length and width of your roof space before deciding on the number and type of vents needed. This planning helps maintain proper airflow, preventing trapped air that can lead to dampness or damage inside your loft conversion or roofing system.
How Do Create, Secure, and Seal a Roof Vent Installation
Creating, securing, and sealing a roof vent installation is vital for maintaining the structural soundness of your roof and guaranteeing adequate ventilation. Appropriate roof vent installation prohibits moisture accumulation and lets stale warm air depart naturally from your attic.
- Identify an optimal location on your roof for the vent installation. This location should ideally be near the roof’s summit for high efficiency.
- Mark the area for the vent hole with a pencil or chalk, ensuring it’s positioned between the rafters.
- Cut out the outlined area using a saw. Use protective gear to shield yourself from potential debris.
- Align the vent over the newly made vent hole. The bottom of the vent must be directed at the attic.
- Fasten the vent securely with roofing nails or screws, conforming to the specific requirements of your chosen vent model.
- Apply roofing cement around the vent opening edges on top of your asphalt shingles or other selected roofing material. This will help achieve a watertight seal.
- If your roof vent doesn’t come with a built-in flashing component, install flashing around the vent’s base. This will help to redirect water away from the opening.
- Seal any gaps between the flashing and the roofing material with more roofing cement or a specialist outdoor sealant.
- Ensure all tiles or slate vents are precisely aligned around the new vent installation to keep your roof’s visual appeal intact.
Once the vent is installed, sustaining your new ventilation system is crucial for its efficiency and longevity.
What is a Roof Vent and Why is it Important?
A roof vent plays a crucial role in ensuring proper ventilation within your home. It allows hot air and moisture to escape naturally from the attic or loft space, preventing heat buildup and damp conditions that can damage your roof structure over time.
Properly ventilated roofs help maintain a balanced temperature across different seasons. This balance reduces the load on your HVAC system, leading to potential energy savings.
Roof vents come in various types, including box vents, Roof ridge vents, and soffit vents. Each type serves a specific function in creating a complete roofing system that breathes well. Poorly ventilated roofs often lead to problems such as mould growth, wood rot, and inefficient energy usage.
Installing roof vents ensures that moist air from areas like bathrooms is efficiently expelled outside instead of being trapped inside the Roof space.
Proper roof vent installation is key to extending the lifespan of your roofing system.

Understanding the Purpose of Roof Ventilation
Roof ventilation plays a crucial role in keeping your home comfortable and safe. It allows air to escape, helping control temperatures in the attic and throughout the house during warmer months.
In winter, it prevents moist air from accumulating under the roof in bathrooms, kitchens, and laundry rooms. This moisture can lead to mould and rot if not properly vented out. Ventilation ensures the structural integrity of your roof remains intact over time.
The system works by balancing air intake at your roof’s eaves or soffit vents with exhaust vents at or near the peak of the roof. This balance is essential for creating an airflow that effectively removes overheated air and moisture from the attic space.
Without this continuous flow, homes are prone to various problems, including ice dams in winter and excessive heating costs due to inefficiency in summer. For homeowners considering installation, choosing between different types of roof vents like Roof ridge vents, gable vents, or soffit vents is important for achieving optimal functionality.
Benefits of Proper Roof Ventilation
Knowing the purpose of roof ventilation paves the way to recognising its benefits. Ventilation ensures a balanced temperature between the attic and outside air. This balance prevents ice dams in colder months and reduces heat buildup during summer.
It extends the life of your roofing materials, from shingles above the vent to underlayment. Moist air from bathrooms or kitchens can cause dampness and rot when trapped in an attic.
However, installing vents allows this moist air to escape, maintaining healthy indoor air quality.
Installing roof vents also lowers energy costs by minimising the need for air conditioning, making your home more energy-efficient. A well-ventilated roof means insulation works more effectively throughout seasons, keeping homes warmer in winter and cooler in summer without overstraining heating or cooling systems.
Roof ventilation also plays a crucial role in protecting against environmental damage by regulating temperatures and moisture levels that can harm your home’s structural integrity over time.
Consequences of Poor Ventilation
Poor ventilation leads to moisture buildup, causing dampness and mould. Such conditions harm the roof’s structure and the home’s air quality. Roof vents prevent this by allowing moist air from bathrooms and kitchens to escape.
Without proper ventilation, your attic can become a breeding ground for mildew.
Lack of adequate roof ventilation also puts extra strain on heating and cooling systems. In summer, hot air trapped in the attic makes air conditioning work harder, increasing energy bills.
During winter, warmth trapped at the top of the house can melt snow on the roof, which refreezes at the eaves, leading to ice dams. These problems highlight why installing enough roof vents is essential for any home.
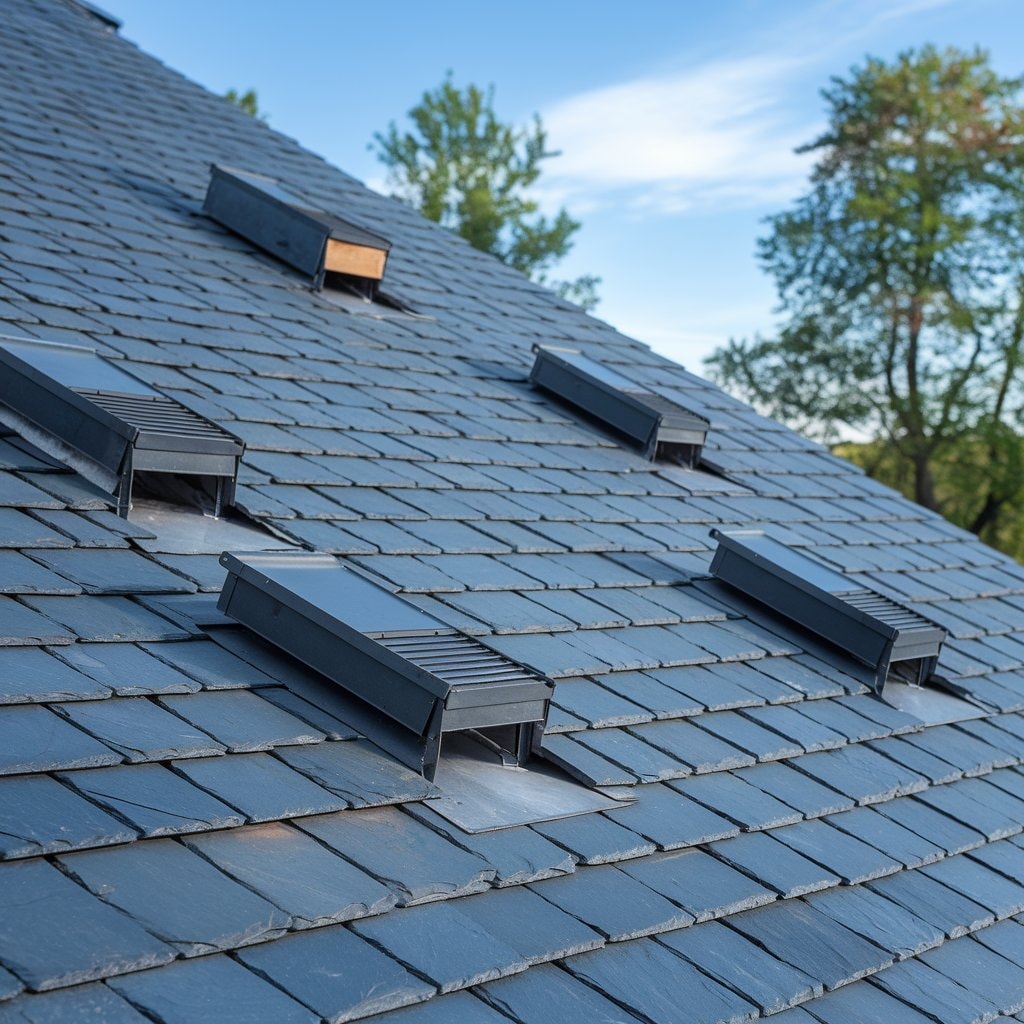
What Type of Roof Vent Should You Choose?
Choosing the right type of roof vent for your home depends on several factors, including the design of your roof and attic space. Ridge vents are discreet and run along the roof’s ridge, offering a sleek look while allowing hot air to escape.
Static vents, which you might know as box vents, require cutting a hole in the roof but provide effective ventilation over specific areas. Turbine vents spin with the wind to draw out moist air from spaces like bathrooms but can be noisier.
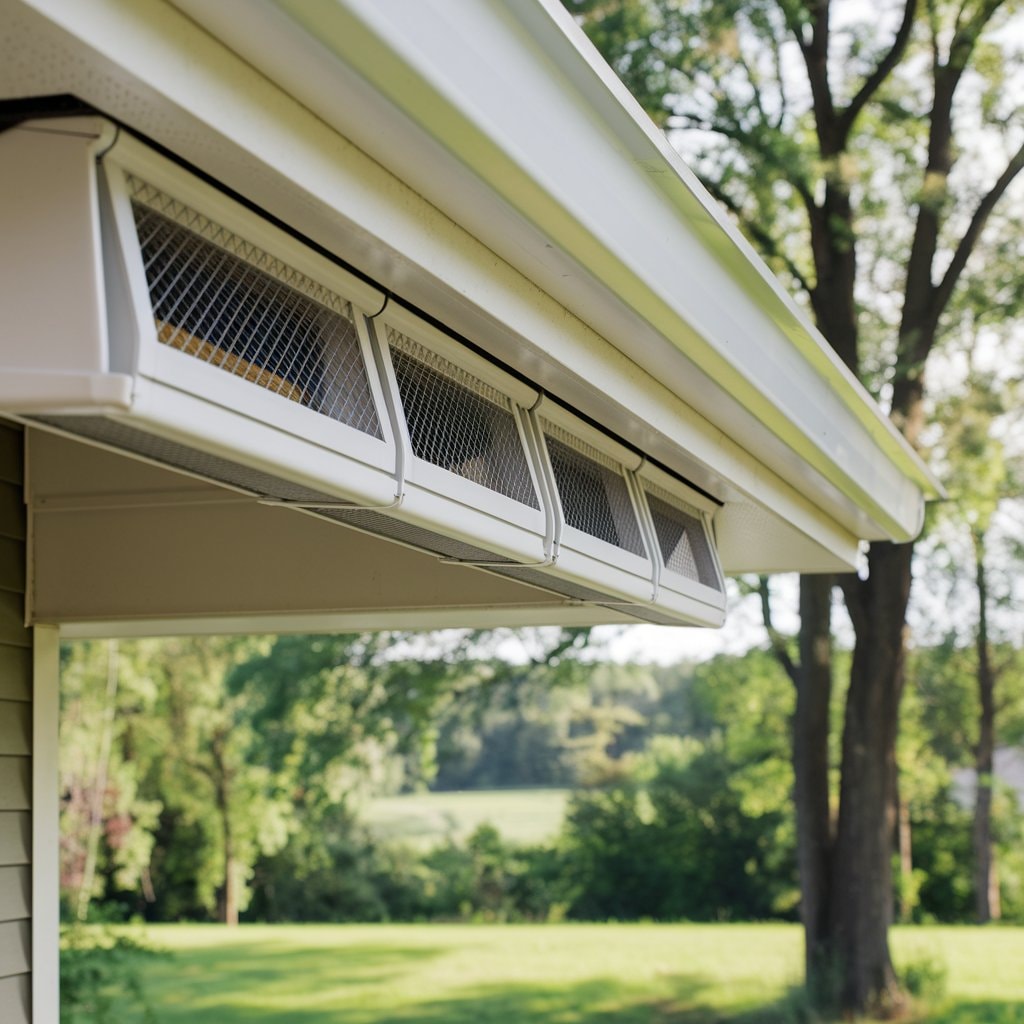
Soffit vents sit under the eaves of your roof and work best when paired with other vent types for optimal airflow. Each vent type suits different needs; pitched roofs often benefit from tile or slate vents designed for their structure.
The choice between Roofing felt lap vents, circular soffit vents, or more traditional tile or slate vents options hinges on balancing aesthetics with functionality – ensuring the proper ventilation your roof requires.
Next, we explore how many roof vents you need to achieve this balance effectively.
Comparing Ridge Vents and Static Vents
Selecting the right ventilation for your roof is vital. Ridge vents and static offer different benefits. This table summarises key points to consider.
| Ridge Vents | Static Vents |
|---|---|
| Blend with the roofline for a more aesthetic appeal. | More visible, can impact roof’s appearance. |
| Provide even cooling along the entire roof deck. | Localised ventilation, may require multiple units for effectiveness. |
| Install along the peak of the roof. | Installation can be anywhere on the roof surface. |
| Work effectively in high wind areas. | Performance can vary with wind speed and direction. |
| Can be more expensive due to complex installation. | Generally cheaper and easier to install. |
Each ventilation type has its advantages. Your choice depends on budget, aesthetic preference, and specific ventilation needs.
Pros and Cons of Turbine Vents
Turbine vents, also known as whirlybirds, play a vital role in roof ventilation. They utilise wind power to remove hot air and moisture from attics and buildings. These vents are popular among homeowners, decorators, builders, and contractors for their efficiency and cost-effectiveness. Below, we present the advantages and disadvantages of installing turbine on your roof.
| Pros | Cons |
|---|---|
| Cost-effective ventilation solution | Performance heavily relies on wind |
| Reduces cooling costs by removing attic heat | May require more maintenance than static vents |
| Can extend the life of your roof by preventing moisture build-up | Not as effective in regions with little wind |
| Easy to install on most roof types | Can be noisy during high winds |
| Environmentally friendly, uses renewable wind energy | Possible leaks if not installed properly |
Turbine are an environmentally friendly choice that can help in reducing energy costs. However, their efficiency is closely tied to the wind’s presence and speed. Proper installation and occasional maintenance can mitigate some of their disadvantages, making them a viable option for many buildings.
Choosing Soffit Vents for Your Roof
Soffit vents play a crucial role in your roof’s ventilation system. They allow air to flow into the attic, balancing the temperature and moisture levels. These vents are installed on the underside of the roof, making them less visible compared to other types, such as ridge vents or static.
For homeowners and builders wanting to install soffit vents, it’s key to ensure that there is enough space for them to fit effectively. This means checking the size of your eaves and ensuring that any insulation doesn’t block airflow.
An efficiently ventilated roof helps extend its life by reducing problems caused by excess heat and moisture.
Selecting soffit vents involves considering their material—usually PVC or aluminium—and determining how many are needed for optimal airflow. The number of asbestos soffits required depends on your roof’s overall size and design, aiming to achieve balanced ventilation alongside other vent types like tile vents or ridge vents.
Moreover, compatibility with your roofing materials—whether you have a metal roof or use traditional tiles—is paramount for an effective installation.
How Many Roof Vents Do You Need?
Calculating the number of vents your home needs is vital for ensuring ventilation. A common rule suggests 1 square footage of vent area for every 150 square feet of attic space if you have a vapour barrier.
If there’s no vapour barrier, aim for 1 square foot per 300 square feet. These guidelines help prevent moisture buildup and overheating in the attic.
Factors like the size of your roof and local climate impact how many vents to install. More vents may be necessary in hot or humid areas to allow moist air from the bathroom and other sources to escape efficiently.
Installing enough vents ensures that fresh air circulation properly, keeping your house cool and dry.
Calculating the Amount of Ventilation Required
To figure out how many vents you need, start by looking at your roof’s size. You should install enough vents to create one square foot of net-free area (NFA) for every 150 square feet of attic floor space if your attic has a vapor barrier.
If there’s no vapour barrier, aim for one square foot of NFA per 300 square feet. This rule helps ensure the best ventilation for your home.
Measuring the size of your attic is vital before buying any vent tiles or fascia vents. Then, use the NFA requirement as a guide to purchase the right number and type of roof vents to choose from—ridge vents, static, or soffit vents.
Each vent tile’s diameter and installation space impact how well it will ventilate your roof, keeping moisture and heat under control. Proper planning prevents problems with roofing ventilation systems later on.
Factors Affecting the Number of Vents
The size of your roof plays a crucial role in determining how many vents you’ll need to install. Larger roofs require more vents to ensure adequate ventilation across the entire length.
The design of your roof can also impact the number of vents required. Complex designs with multiple peaks and valleys may need additional venting solutions compared to simpler, flat roofs designs.
Climate is another important factor; homes in hotter areas might need more to dissipate heat effectively, while those in colder climates must balance vent numbers carefully to prevent excessive heat loss.
Material used for roofing affects the installation and functionality of roof vents. Different materials breathe differently, so selecting the right type of vent for your specific roofing material is vital for optimal performance.
Inspection from roofing professionals helps identify unique needs based on material properties, ensuring each vent contributes efficiently to overall roof health.
Ensuring Proper Roof Ventilation
To ensure proper roof ventilation, one must first assess the size of their roof and the specific needs of their home. Installing the right number of vents is critical for maintaining an effective ventilation system.
Homeowners should calculate the amount of ventilation required by considering factors such as attic space and climate conditions. For instance, a general rule states that there should be 1 square metre of vent area for every 150 square metres of attic space.
This ratio helps in preventing moisture accumulation and heat buildup.
Builders often recommend mixing different types of vents to optimise airflow across the entire roof. Both intake and exhaust vents allow cool air to enter through circular soffit vents at the bottom and hot air to escape from ridge vents or turbine at the top.
roofing contractor might install more static if they want to increase airflow without drilling more holes into your roof, making it simpler to maintain balanced temperatures inside.
A well-ventilated roof leads to a cooler house in summer and a dryer attic in winter.
How Much Does It Cost to Install Roof Vents?
The price to fit roof vents fluctuates, influenced by various elements. These factors encompass the variety of vents you pick and whether you employ a roofer for their installation or opt for a DIY approach.
On average, the materials needed for a simple vent installation can start from as little as £100-£200 for DIY fans. Seeking assistance from a professional roofing contractor might escalate your costs significantly, elevating expenses to between £250-£500 per cent, including labour.
This price disparity largely arises from the difficulty of installation and the excellence of the materials selected.
Static, ridge vents, and turbine are offered at varying prices owing to their design challenges and functionalities. Ridge vents generally carry a steeper price tag but deliver superior ventilation across the pinnacle of your roof.
Conversely, static are more straightforward and less expensive but might demand more units to achieve similar ventilation efficiency. Turbine vents generate outstanding air circulation but rely on wind for functioning, which may not be suitable for all sites.
Thorough financial planning for roof vent installation involves weighing both immediate costs and long-term advantages in relation to enhanced airflow and energy savings in your dwelling.
Understanding the Costs of Materials and Labor
Costs of materials for roof vent installation can vary widely, depending on the type and quality you choose. For example, static vents may cost less than ridge vents or turbine vents. Materials such as flashing and sealant are also part of the expenses.
These costs add up quickly when you plan to install multiple vents across your roof.
Labour charges form a substantial portion of the overall expense of installing roof vents. Hiring a roofer will cost differently based on their experience and your location. It’s wise to get several quotes to find competitive pricing for your roof installation project while ensuring quality workmanship is not compromised in the process.
Maintaining Your Roof Ventilation System
Regular inspections are key to keeping your ventilation system in top shape. Check your vents at least once a year for any signs of blockages or damage. Leaves, dirt, and other debris can clog vents, making them less effective.
Clearing these blockages ensures air flows smoothly through the ventilation system.
Look out for signs of wear and tear on the vents themselves. Cracks or rust indicate it’s time to consider replacing your roof vent. Installing new vents is simple and boosts the efficiency of your home’s ventilation, preventing issues like dampness and mould growth inside the attic.
Keep an eye on the condition of flashing around each vent, too; improper sealing can lead to leaks during wet weather, causing further damage to your property.

Regular Inspections and Maintenance Tips
Maintaining your ventilation system is crucial for its efficiency and longevity. Proper care ensures that vents perform optimally, prolonging the life of your roof.
- Inspect your roof vents annually to identify any signs of wear or damage.
- Look for blockages in the vents, such as leaves or nests, that could prevent airflow.
- Check that all flashing around the vents is intact and securely fixed to prevent leaks.
- Ensure vents are not covered by insulation, as this can block airflow.
- Replace any rusted or damaged vents to maintain proper ventilation.
- Seal any gaps or holes around the vent with roofing sealant to prevent water ingress.
- Clean the underside of the vent from inside the attic to remove dust and debris.
- Verify that each vent’s opening is clear from the top of the roof and free from obstructions.
- Nail through the roof carefully when installing new vents to avoid leaks.
- Install flashing correctly when you install a roof vent to ensure it’s weatherproof.
- Monitor for changes in indoor temperature, which could indicate poor ventilation.
- Schedule professional inspections periodically to assess hard-to-reach areas.
Taking these steps will help keep your ventilation system functioning efficiently, reducing moisture and lowering energy costs associated with heating and cooling your home.
Signs of Ventilation Issues
Moisture buildup in the attic signals ventilation problems. This often leads to mould growth and wood rot, affecting the roof’s structure. Another clear sign is ice damming during colder months, which happens when heat escapes through a poorly ventilated roof, melting snow that refreezes at the edge of your roof.
High energy bills can also point to insufficient ventilation. If your cooling costs spike in summer, it might mean hot air isn’t escaping through your vents as it should. Look out for uneven temperatures in rooms, too; this indicates airflow issues caused by subpar roof ventilation.
When to Replace or Upgrade Your Vents
Over time, your roof vents may show signs of wear and tear. Cracks or rust on the vent can let water seep through. If you notice any damage, it’s time to install new roof vents. This keeps your home dry and well-ventilated.
Sometimes, advancements in design offer better airflow efficiency. Upgrading to newer models could help lower your energy bills.
You should also consider replacing vents if they’re blocked or not working properly anymore. Animals or debris blocking a vent will stop it from doing its job right. Installing flashing and drilling holes for new roof vents ensure they fit perfectly and work efficiently.
Always choose the best type of vent that suits your roof’s needs to maintain ventilation throughout the year.
Conclusion
Installing your roof vents correctly is crucial for the health of your house. By choosing the right type and making sure to install them accurately, you ensure proper ventilation across your roofing system.
This protects against moisture damage and enhances energy efficiency. Each home may need a different number of vents based on its design and size.
The costs involved in installation vary depending on the choice between types like static, ridge vents, or turbine vents. Planning allows for better budget management for both materials and labour costs associated with installing roof vents.
Regular maintenance further guarantees their performance over time, safeguarding your property’s structure and interior climate control.


