

Have you noticed water leaking into your house every time it rains? This could mean your roof flashing, the thin metal component designed to channel water away from vulnerable areas of the roof, needs attention.
Roof flashing is vital for safeguarding your home dry and secure by preventing water damage.
A surprising fact is that properly installing roof flashing can extend the life of new roofs significantly. In this blog post, we’ll guide you through how to install a roof flashing efficiently, covering everything from choosing the right material to avoiding common installation mistakes.
Get ready to protect your home from water leaks and damage. Keep reading to learn more!
What is Roof Flashing and Why is it Important?
Moving on from the introduction, we delve into roof flashing, a vital aspect of roofing that many might overlook. Roof flashing serves as a thin layer of material, typically metal, placed where different sections of the roof meet or around installations like chimneys and vents.
Its primary role is to direct water away from these vulnerable joints and prevent leaks into the home. Without proper flashing, buildings can suffer from water damage internally, leading to costly repairs.
Roof flashing importance must be balanced; it safeguards your home against moisture intrusion, which can cause rot and mold within the structure. In areas where heavy rain is common, ensuring your roof has durable and well-installed flashing becomes even more crucial for maintaining the integrity of your roof.
A secure home starts at the top – with good quality roofing practices.
Understanding the Role of Roof Flashing
Roof flashing is crucial for shielding your home from water damage. This thin metal material directs water away from critical areas, such as where the roof meets a vertical wall or around chimneys and vents.
By doing so, it prevents moisture from seeping into the structure and causing mold, rot, or structural damage.
Builders install roof flashing at various points to ensure a secure and weatherproof finish. Whether using step flashing along the sides of skylights or continuous flashing against longer stretches of vertical walls, each type serves the purpose of keeping water out.
The correct installation of roof flashing significantly extends the lifespan of your roof by defending against harsh weather conditions and avoiding costly repairs down the line.
Why Roof Flashing is Essential for Your Home
Roof flashing serves as a protective shield, halting water from entering your home via the openings where different roof sections intersect. It facilitates the redirection of water away from these sensitive points, channeling it into gutters instead.
This function is vital as even minor instances of water penetration can escalate into critical problems like mold, rot, and structural impairment over time. The absence of correct flashing installation around chimneys, vents, and where the roof converges with walls or other rooftops puts your home in a precarious position.
The installation of new flashing or repair of existing flashing efficiently safeguards the structural integrity of your home while also preserving its insulation characteristics. Moisture penetration through unflashed zones can result in insulation becoming moist and less operative, yielding higher heating costs during winter.
Moreover, premium roof flashing materials like aluminum or steel paired with suitable sealants offer durability to the flashing themselves and the comprehensive roofing system. Acquainting yourself with usual issues tied to old flashing will assist in preserving a solid and weather-resistant flash on your roof.
Common Problems with Old Flashing
Old flashing often causes leaks, particularly around the chimney and vent pipe areas. Metal corrosion weakens its ability to keep water out. Homeowners sometimes notice signs of wear, like rust on steel flashing or cracks in aluminum flashing.
These materials can only succeed over time if properly maintained.
Incorrect installation is another typical issue with old roof flashings. Shingles may overlap poorly, leading to gaps where water seeps in. Sometimes the use of inadequate roofing cement or sealant contributes to these problems, making regular checks and repairs essential to ensure your roof stays waterproof.
Different Types of Roof Flashing: A Comprehensive Guide
Exploring various roof flashing forms can provide us with valuable knowledge about their vital role in maintaining the safety and dryness of homes. Roof flashing can come in several formats, such as step, valley, kick out, and drip edge, each with a unique purpose.
Step flashing safeguards the junction of roofs and walls by comprising rectangular pieces layered with shingles to promote water flow away from the wall. Valley flashing protects the roof valleys where two sections intersect by directing rainwater into gutters.
Kickout flashing helps deflect water from walls at the roof’s edge to avoid damage. Drip edges are positioned at the roof ends to assist in dropping water directly into gutters and not beneath the roofing materials.
Identifying the correct type for your roof necessitates knowledge of these distinctions and how they connect to your house’s design. A vent pipe and chimney flashings, for example, form a seal around protrusions to block any moisture intake, while copper roof skylight flashings provide strong protection against skylight leaks.
Aluminum and steel are commonly chosen materials for their enduring nature and corrosion resistance. Professionals suggest utilizing superior roofing nails and a compatible flashing sealant during installation for optimal outcomes.
The choice of the right installation procedure and material is pivotal in ensuring enduring protection.
This expert input encourages homeowners to thoughtfully select materials such as aluminum or steel flashings prior to initiating the installation steps highlighted in later sections.
Exploring Various Types of Roof Flashing
Roof flashing is a thin metal piece that keeps water from getting into places it shouldn’t on your roof. You can find different types like apron flashing, counter flashing, and step flashing.
Each type has its job. Apron flashing protects the area Where the roof intersects with a vertical surface, such as a wall or chimney, and counter flashing protects the upper edge of the apron or base flashing to add extra protection against water.
Step flashing is installed where walls meet the roof at an angle, directing water away from these critical areas.
Choosing the right kind of roof flashing depends on where you need to install it and what sort of weatherproofing challenge you’re facing. For example, vent pipe flashings are designed specifically for pipes sticking out of your roof to keep rainwater from seeping in around them.
Kickout flashings direct water into gutters instead of letting it run down the side of your house. Homeowners need to pick their roofing materials carefully because using the wrong types could lead to leaks and costly damage over time.
Choosing the Right Type of Flashing for Your Roof
Selecting the correct type of flashing for your roof is crucial to prevent water damage. Different roofs need various kinds of flashing. For instance, a sloped roof benefits greatly from step flashing.
This method helps in directing water away from where the roof meets a wall. On flat or low-pitched roofs, metal flashing works best as it offers an enhanced barrier against pooling water.
The choice between aluminum and steel flashing hinges on your specific needs and environment. Aluminum is lightweight and corrosion-resistant, making it an ideal choice for most homes.
Steel, though heavier, provides unmatched durability in severe weather conditions. Always use roofing sealant with any type of flashing applied to provide a secure, watertight seal around vents or chimneys where leaks are prone to happen.
Understanding the Uses of Kickout and Step Flashing
After choosing the right type of flashing for your roof, it’s essential to understand how kick-out and step flashing function. These pieces play crucial roles in guiding water away from critical areas.
Kickout flashing directs water into the gutter at a roof end, preventing it from running down the wall. This action stops water from seeping behind sidings or windows, which could lead to damp issues inside the house.
Step flashing is installed where a roof intersects with a vertical surface, such as a wall or chimney. Each piece is layered under each row of shingles and against the wall, creating a stair-step pattern.
This setup ensures that any water running down the wall or around obstacles flows onto the top of the flashing and then safely off the roof. Proper installation of these types ensures your home stays dry and damage-free.
Correctly installing kickout and step flashing is key to maintaining your home’s integrity against harsh weather.
How to Install Roof Flashing: A Clear Step-by-Step Process
Installing roof flashing correctly is vital for keeping your home weatherproof. This guide will walk you through the process, ensuring a secure and durable fit.
- Check the area where you will install flashing. It should be clean and dry.
- Measure the length needed for the piece of flashing. Always add a few centimeters for overlap.
- Cut your thin metal flashing to size with sheet metal snips.
- Bend the flashing into the required shape, such as corner flashing or step flashing, using a metal brake.
- Apply roof cement onto the roof surface where the first piece of flashing will go.
- Place the flashing onto the cemented area firmly.
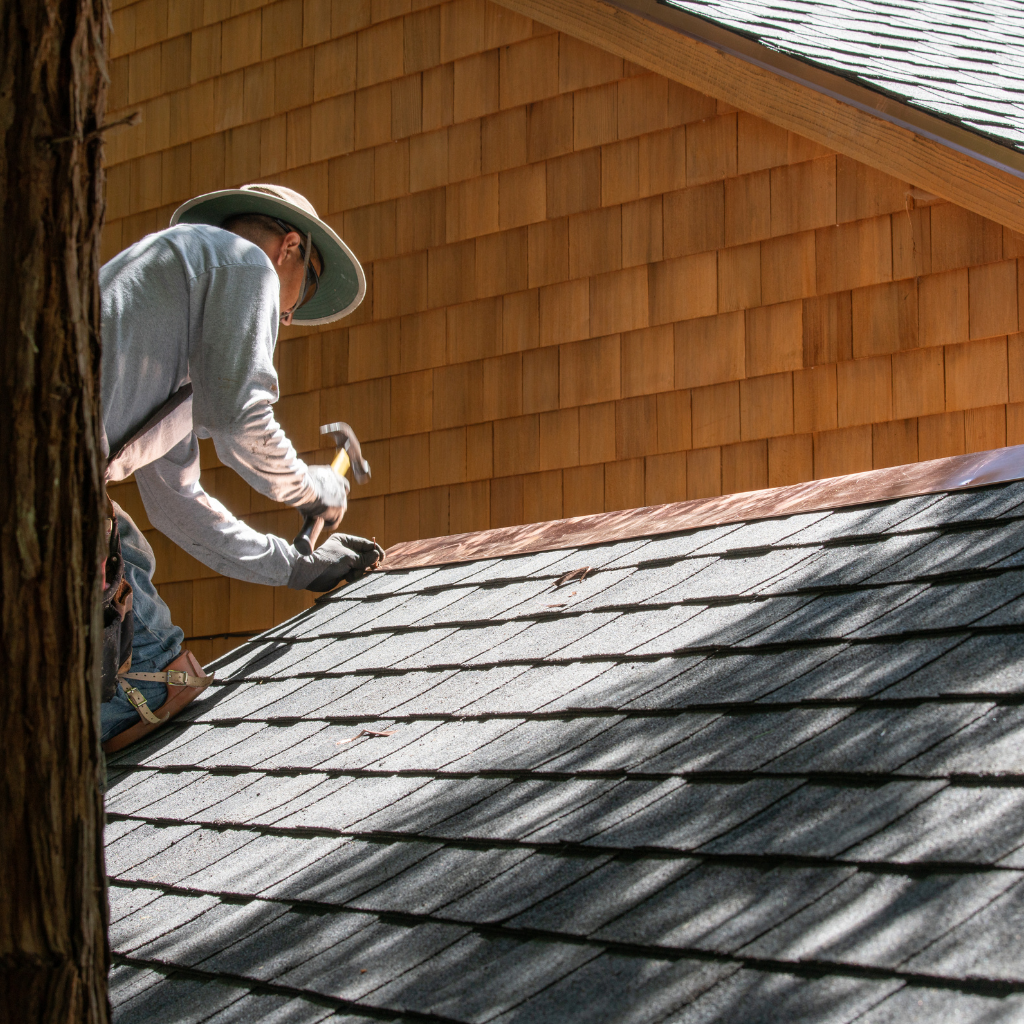
- Secure the flashing with roofing nails spaced about 30 cm apart.
- Install your underlay over the base of the flashing for extra waterproofing.
- For vent flashing, measure the diameter of your pipe (fluid conveyance) and cut out an appropriate opening in your vent piece of flashing.
- Slide vent flashing over pipes and nail it into place on top of underlay, applying sealant around edges for a watertight seal.
- When installing step flashing against a wall or chimney, place each piece so it overlaps the one below by at least 5 cm.
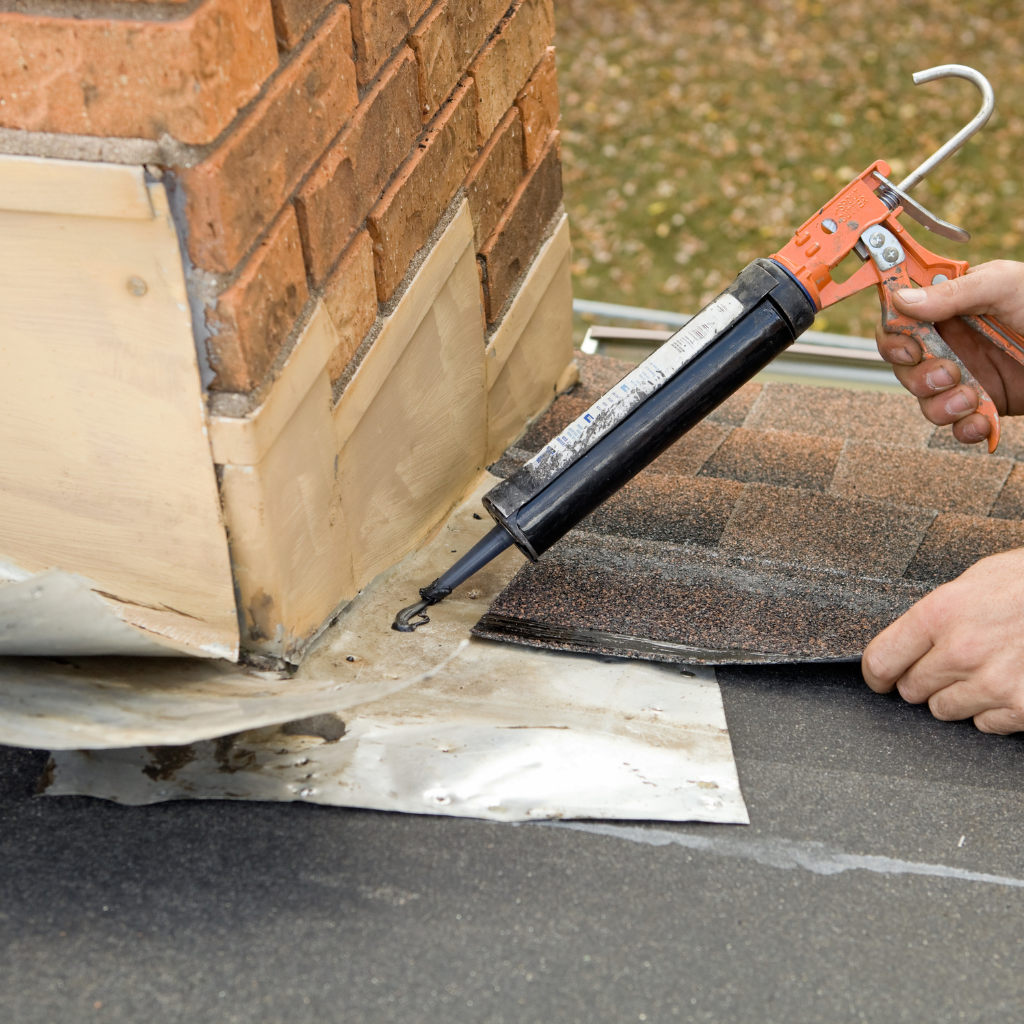
- Apply sealant along edges where the step or corner flashing meets brickwork or siding to ensure no water seeps through gaps.
- Use counter-flashing over top edges of steps or corner pieces to doubly secure them against heavy rains and strong winds.
This systematic approach to installation plays a crucial role in redirecting water away from critical areas of your roof, preventing potential damage and extending its lifespan significantly.
Preparing for Roof Flashing Installation
Preparing for roof flashing installation involves careful planning and gathering the right materials. This ensures a secure and weatherproof seal on your roof. Here are the steps to get ready:
- Inspect the area where you will install the flashing. Look for any signs of damage or wear on the shingles and flashing that is already there.
- Measure the length of the area needing flashing to determine how much material you need. Keep in mind that pieces must overlap by at least 10 cm for a watertight seal.
- Choose your flashing material. Aluminum and steel are popular choices due to their durability and resistance to rust.
- Gather your tools and materials. You will need a hammer, nails, utility knife, measuring tape, and flashing sealant types suitable for your chosen material.
- Clean the surface where you’ll apply the new flashing. Remove any debris, dust, or old sealant from around chimneys or vents to ensure a clean bonding surface for new materials.
- Check local building codes to confirm requirements for roof flashing installation in your area.
- Plan for safety by securing a ladder firmly and using a safety harness if working at great heights.
These steps prepare you thoroughly for installing roof flashing effectively, keeping your home protected against water damage.
Tips for Installing Flashing Around Chimneys and Vents
After covering the step-by-step instructions to install flashing, we move to specific advice for sealing those tricky areas around chimneys and vents. These tips ensure your roof remains weatherproof and secure.
- Measure the chimney base or vent area accurately before cutting any flashing. This minimizes waste and guarantees a perfect fit.
- Cut the step flashing into rectangular pieces that will easily cover the sides of the chimney or vent.
- Slide the first piece of step flashing under the shingles at the bottom corner of the chimney or vent. Make sure it directs water away from the opening.
- Secure each piece of flashing with roofing nails, but do not nail them into the wall. This allows room for expansion and movement.
- Apply roof flashing sealant between layers for extra protection against water leaks.
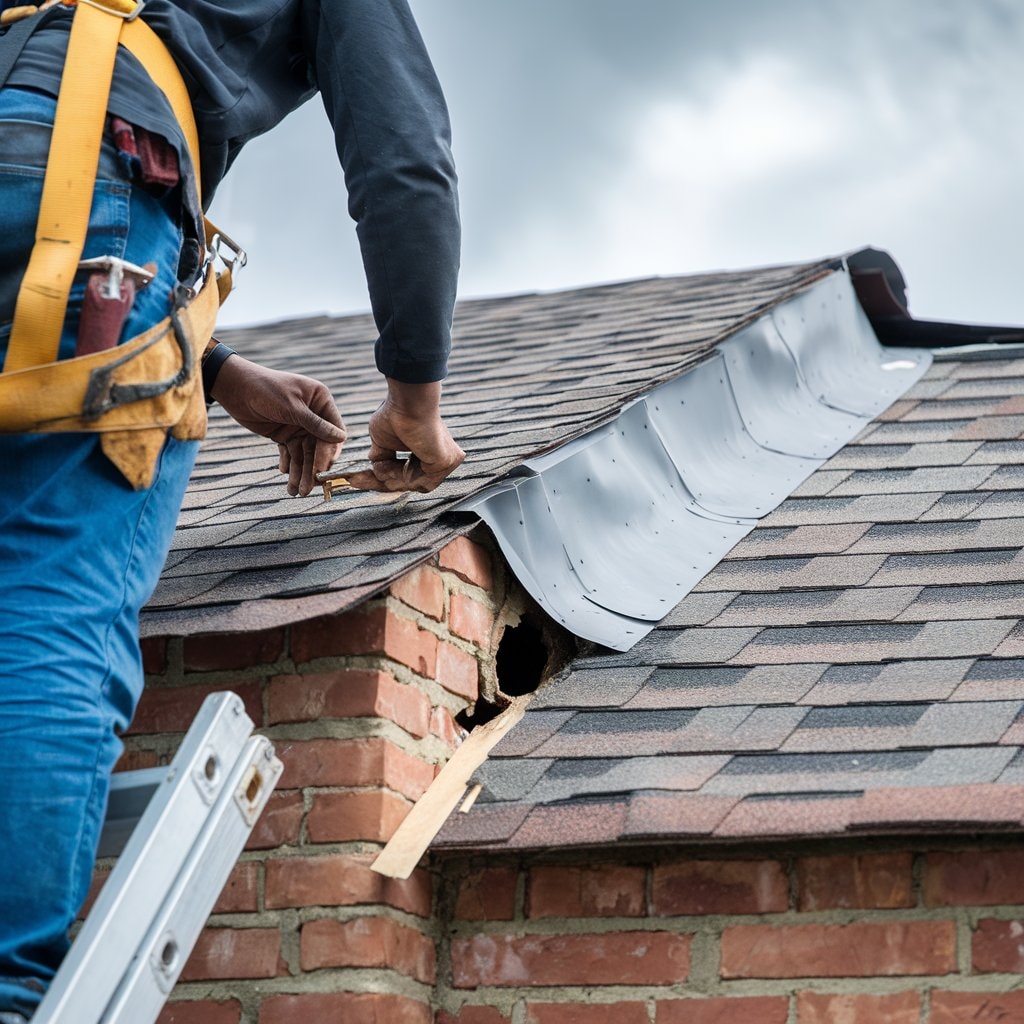
- For chimneys, install counter flashing by cutting into the mortar joint and inserting metal flashing into this cut. Seal it securely.
- Ensure that no part of the flashing is lifted or bent upwards, as this could allow water to seep underneath.
- Overlap each piece of step flashing as you work your way up the roof, always ensuring water flows away from openings.
- Check that all installed flashings are flat against both roof and vertical surfaces without any gaps.
- Regularly inspect your flashing around chimneys and vents after severe weather conditions to catch any issues early.
This approach will help keep your roof in top condition, directing water away effectively and preventing leaks around these vulnerable areas.
Materials Needed for Installing Roof Flashing
For a successful roof flashing installation, you need the right materials and tools. Choose between aluminum and steel flashing based on your roofing needs and weather conditions.
Aluminum is both lightweight and highly resistant to corrosion, making it an ideal material for most environments. Steel, on the other hand, offers durability in extreme weather but requires a protective coating to prevent rust.
Both types ensure water redirects away from critical areas of the roof.
Selecting high-quality roof flashing sealant is crucial for weatherproofing the joints between the flashing and roofing materials. The sealant offers an added barrier against water penetration, preventing leaks that could lead to damage inside your home.
You will also need nails or screws to secure the flashing in place firmly on both the roof plane and adjacent vertical surfaces.
A proper installation starts with high-grade materials – Cutting corners on quality can result in expensive repairs later on.
Essential Flashing Material for Installation
Selecting the right flashing material is crucial for a secure roof. Homeowners often choose between aluminum and steel due to their durability and effectiveness in weatherproofing.
Aluminum, lightweight and resistant to corrosion, works well in most climates. Steel, known for its strength, offers extra protection in areas with severe weather conditions.
Using the correct flashing sealant types also plays a key role in installation success. Sealants ensure that joints remain watertight, preventing water from seeping through vulnerable spots around chimneys and vents.
Make sure to apply an appropriate sealant that complements your choice of flashing material for optimal performance and longevity of your roof replacement or repair project.
Choosing Between Aluminum and Steel Flashing
Homeowners and builders must decide between aluminum and steel when choosing materials for roof flashing. Aluminum flashing is lightweight, resistant to corrosion, and easy to shape around corners on the roof.
It’s ideal for most climates and offers good protection against rain and snow. On the other hand, steel flashing is stronger and more durable than aluminum. It can withstand severe weather conditions but requires a protective coating to prevent rust.
Both types of flashing direct water away from critical areas of the roof, ensuring that homes stay dry inside. The choice often depends on specific needs, such as the local climate or aesthetic preferences.
Aluminum might be preferred for its flexibility in installation around chimneys or vents. Steel could suit those looking for longevity in regions with harsh weather conditions. Always use quality flashing sealant types with both materials to ensure a secure fit that keeps out moisture effectively.
The Importance of Flashing Sealant in Installation
Flashing sealant plays a crucial role in roof flashing installation. It ensures that the joints between the flashing and other roof parts are watertight. This prevents water from seeping under the shingles, reducing risks of damage to roofs and interiors.
Builders use various types of roof flashing sealants to meet different needs. The choice depends on factors like weather conditions and roofing material.
Proper application of sealant extends the life of roof flashing dramatically. It acts as a barrier against moisture, guiding water away from vulnerable areas like chimneys and vents.
With a reliable sealant, even high-quality flashing gains effectiveness over time, leading to costly repairs or replacements for homeowners. Therefore, selecting the right type of sealant is essential for long-lasting protection against weather elements.
Common Mistakes to Avoid During Roof Flashing Installation
Installing roof flashing correctly is crucial to prevent water damage. Many homeowners and builders face challenges during this process.
- Not checking the condition of existing flashing before installation can lead to issues. Old or damaged flashing should be repaired or replaced.
- Ignoring the need for proper sealing between the roof flashing and shingles causes leaks. Use quality roof flashing sealant types for a secure fit.
- Choosing incorrect flashing material can affect longevity. Between aluminum and steel, consider your climate and roofing material.
- Installing flashing without considering the water flow direction will result in water seepage. Ensure that the edge of the roof directs water away efficiently.
- Skimping on overlapping can expose gaps in coverage. Flashing must overlap sufficiently to provide thorough coverage.
- The need to install step flashing on top of sides where roofs meet walls leads to vulnerabilities at these junctions.
- Failing to secure the flashing firmly means it might shift or lift in strong winds. Nails should anchor each piece without piercing areas exposed to water.
- Overlooking kick-out flashing at the ends where the gutter meets the roof wall junction could funnel water behind the siding, causing damage.
- Installing corner pieces incorrectly leaves room for leaks at vulnerable points on the roof.
- Poor maintenance habits shorten the life of your roof’s flashing, copper, or otherwise; regular inspections ensure it remains in good condition.
These steps help maintain a durable and weatherproof home environment by ensuring that every part of the roofing system works together effectively to keep out moisture and protect against weather-related damage.
Identifying and Avoiding Installation Errors
One common mistake during roof flashing installation is not ensuring proper sealing and overlap. This can lead to water seeping through, causing damage to your home. To avoid this, always check the sealant’s quality before applying it and make sure there’s sufficient overlap between flashing pieces.
Another error is using incorrect materials for your specific roof type, which might not provide the necessary weatherproofing or durability needed.
Proper maintenance of roof flashing bolsters its longevity and performance. Regularly inspect your flashing for signs of wear or damage, such as rust on metal flashing or cracks in sealant.
Replacing damaged sections promptly prevents more extensive issues from developing. For those installing corner flashing or working around a chimney, precision is key; any gap can become a potential leak point.
Stick to recommended practices and materials for your roofing needs to ensure a secure and effective installation.
Ensuring Proper Sealing and Overlap
After you’ve pinpointed and sidestepped standard installation errors, concentrate on guaranteeing a valid seal and overlap of the roof flashing. This process is vital to create a waterproof boundary that safeguards your home from potential water damage.
Accurately installed flashing redirects water from sensitive areas, minimizing the chance of leaks. For efficient weatherproofing, confirm that each piece of flashing overlaps the one beneath by at least 10 cm (4 inches).
This technique prevents water from trickling beneath the flashing.
Utilize a top-grade flashing sealant at all seams and junctions to fortify this shield. Administer the sealant profusely around areas where roofing intersects walls, chimneys, or other features.
Prioritise corners and edges where water may accumulate or stream more profusely during severe rainfalls. Appropriate use of sealant not only secures your roof but also prolongs its durability by preventing moisture accumulation that can result in rot or mold development beneath shingles.
Maintaining Your Roof Flashing for Longevity
To ensure your roof flashing remains in good condition, regular checks and maintenance are crucial. Flashing directs water away from the home, protecting it against leaks and water damage.
It’s vital to inspect all pieces of flashing around chimneys and vents annually. Look for any signs of wear or damage, such as corrosion on copper roof flashing or loose sections that may need repair.
Fixing these issues promptly can prevent costly repairs in the future.
Cleaning debris from your roof helps maintain the integrity of the flashing. Leaves and other materials can trap moisture against the flashing, leading to rust on metal types like steel and aluminum.
Using a non-corrosive cleaner will keep them functioning effectively for longer periods. Replace any damaged sections immediately to continue directing water away efficiently. Next up: Conclusion.
Conclusion
Installing roof flashing correctly ensures your home stays keep your home dry and secure, no matter the weather. Homeowners, builders, and contractors need to understand that proper installation keeps common problems at bay.
Choose the right materials—whether aluminum or steel—and don’t forget the importance of flashing sealant. It’s crucial for weatherproofing every corner of the roof.
Good maintenance practices extend the lifespan of roof flashing, saving you from costly repairs down the line. Ensure each rectangular piece of flashing fits perfectly between two roofs or around a chimney for optimal protection.
By steering clear of common mistakes, like improper sealing and overlap, your roof will remain in good condition for years to come.


